Rim Joist rot and Jack stud sank near sliding glass door With Pics

House Repair Talk

Help Support House Repair Talk:

This site may earn a commission from merchant affiliate links, including eBay, Amazon, and others.

mjzraz

Member
Joined
May 18, 2008
Messages
11
Reaction score
0
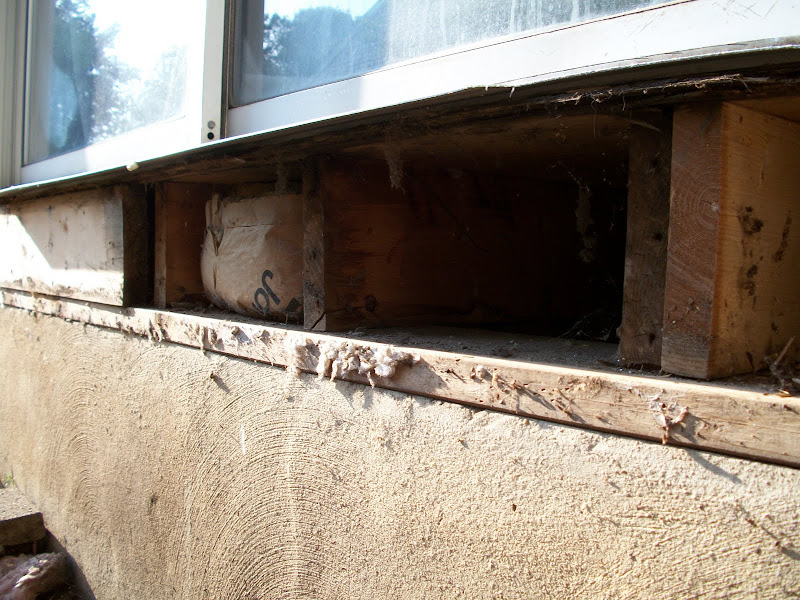
I am renovating my family room/living room and will be replacing my sliding glass door with a new patio door. I discovered a low spot on the subfloor near the corner of the sliding glass door. Upon removing siding I found rot and no flashing or sill pan. In the past there was a deck ledger board attached to the rim joist (over the aluminum siding) with no other flashing.

It's a 2 story house 2x4 walls. 2x8 floor joists on a14' span Block wall basement.

The subflooring above the rim joist, but below bottom 2x4 wall plate is partially rotted. the Rim joist rot is confined to one floor joist space (joists run perpendicular to the rim joist 2x8) which is sitting on a 2x6 sill plate.

The Jack and King studs fall in the center of the floor joist space so structurally they are supported by the subfloor and the rim joist. It appears that the end of the wall has sunk 1/4" due to the water damage. In the pictures from the inside, I held a level and could see the bottom plate of the wall dips down 1/4" toward the rot and laying a level on the floor, there is a low spot in the subfloor at the same area. Outside, you can see the aluminum sill tilted toward the corner a bit.

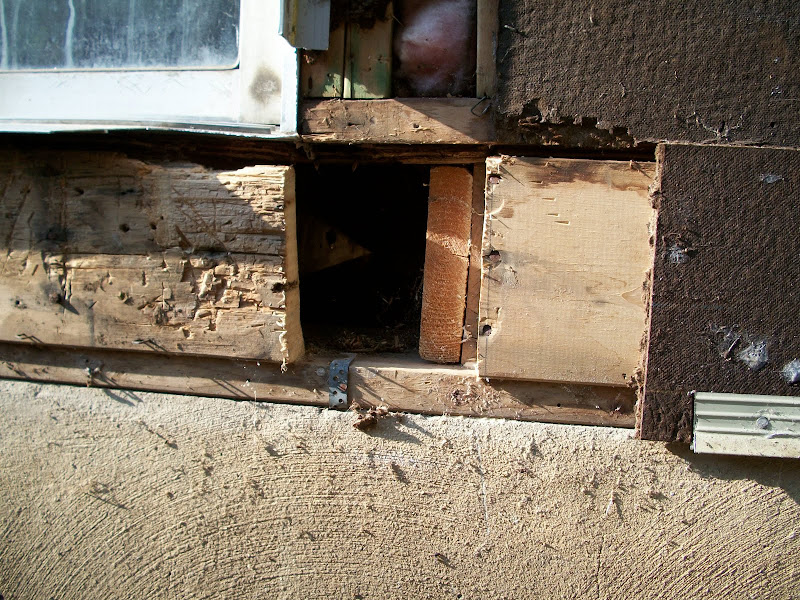
My repair plan is what I need help with. Replacing the Rim joist itself seems straightforward, I will support the floor joists in the basement with a 4x6 beam and screw jacks, cut it back to where it isn't rotted and nail it back into the floor joists. I actually sistered some floor joists a few years ago so I have plenty to nail to.

What I am not sure how to do is to replace the subflooring that is UNDER the wall plate and secondly how to bring the wall plate back up and lastly how to support it better (if needed) since it falls in a floor joist cavity. I thought about doubling up on the 2x8's when I attach the repair to the rim joist, that way there are 2 2x8's under the end of that wall where the jack and king studs are supporting the load.

back of house.JPG

rimjoist.JPG

RJClose.JPG

outside.JPG
 
Take the door out, remove the rotted plywood by cutting it back into the room until you have good material, install blocking where the new seam is.
Then remove the jack stud, cut the bottom plate back to good wood, and install a jack onto the new plywood and box joist....less shrinkage that if you put it on the new piece of bottom plate, which will shrink. And the jack is what holds the header weight above anyway.

make sense? let me know , and good luck.

So I sketched out what i think You mean - let me know if I have it correct?

You are probably right that I need to replace more plywood than I can see. I do know that it doesn't come further into the room than the bottom of the door. Are you saying one piece of plywood to repair the area under the door first, then after that is done, I remove the jack and wall plate and install a 2nd piece of plywood, then a new bottom plate, then the new jack?

Am I correct in assuming that I need to build a temporary wall parallel to the outside wall or can I put a screw jack under the header (in the doorway) and use that for support while I replace the jack/plywood/bottom plate?

Im surprised about the shrinkage issue, never would have considered that, so thanks. Why wasn't that an issue when it was all new?

existing.jpg

repaired.jpg
 
What you have looks fine. The old wood has decayed, this is what caused the sinking. Just make sure you support any plywood joints with a block of wood or backerboard. I would also use some pl400 glue to help keep things together. The new wood will also shrink a bit, If you can, run the jack all the way to the sill plate, this will let the new rim joist shrink and keep the header above in the same place it is now.
Make sure you flash the door at the bottom the right way and overlap the sidewall drainage plane (tyvek or tarpaper) over the new door pan flashing. Then you will not have this issue again.

Youtube has some pretty good vids on how to flash a door.

Good luck, you got it.:)
 
I started working on this repair. I found a few things that have me a little confused.

1. The original rim joist is a 2x8 from 25 years ago and measures 7 1/4". I have a 2x8 in pine that measures 7 1/8" looking on the stack at the lumber yard, they measure anywhere from 7" exactly to 7 3/16" and the pine seems soft an knotty. I liked the look of the Fir 2x10's (less knots and felt denser) I was thinking of ripping a 2x10 Fir board to exactly 7 1/4". Would that be better than shimming?

2. When I cut out the rim joist the last 3' 6" of it were loose and came off easily and I would have thought the area where 2 pieces butted together would fall on a joist, but it doesn't. The next piece was butted and met in between 2 joists. I am thinking of adding some blocking in that joist cavity to sister to the rim joist and have something to nail to. Hard to see, but the spot is on the left i the pic:

100_1958.JPG

100_1954.JPG


3. Because of the rot, the support for the jack and king stud was missing and the sub floor was pushed down and is preventing me from getting the rim joist in place. I can't fit a jack in there and even if I could it would be in the way of the rim joist. under the problem area, I want to double up the rim joist and any jack would be in the way. I thought about nailing 2 2x10's together to make a wedge and ripping them to size and hammering them into the joist cavity with a big hammer to get the rim joist in place, like this:

After that, I could pull out the wedge from the inside and add the sistered section of rim joist. Is there a better/easier way?

FYI, I have a 4x6 beam in the basement with 2 screw jack posts holding it up @ 2' from the wall.

wedge.jpg
 
All you really need is , some more confidence. You are doing it all just fine actually. The questions you posted are your answers.:D

You are right on track, and if you cannot get a jack under the joist, always cut a big shim and bang it in there until you get to the level you want.

Nice job.:usa:
 
All you really need is , some more confidence. You are doing it all just fine actually. The questions you posted are your answers.:D

You are right on track, and if you cannot get a jack under the joist, always cut a big shim and bang it in there until you get to the level you want.

Nice job.:usa:
Thanks, You might be right, I have been procrastinating this part of the job and once I finally made the cut into the rim joist, I felt better as it's just a matter of cutting pieces to replace what is missing and making it better. I'll start on it tonight after the sun is a little lower (Southwest exposure where I am working)

Is it overkill to put PL400 between the rim joist and the floor joist ends and sill plate when I nail it?
 
PL is great to help hold things together, and fillin some gaps.
Good luck with the weather.:)
 
Back
Top