Tape & Float Help Needed

House Repair Talk

Help Support House Repair Talk:

This site may earn a commission from merchant affiliate links, including eBay, Amazon, and others.

SPISurfer

Well-Known Member
Joined
Oct 14, 2008
Messages
76
Reaction score
1
I am getting frustrated. I'm using paper tape and not the fiberglass mesh.

I saw a YouTube demo to get this tape and float thing down. The guy put joint compound first and then wet the tape before applying it.

The problem I'm having is, now that it's dry, there a places where the tape has bubbled up. I'm guessing because of the wetting.

1. Is there anything else I could be doing wrong to cause bubbling?
2. Do I need to rip out the tape, sand and reapply or can I peel the tape shove compound under it and smooth?
3. Could anyone provide better instructions or a link for taping the corners?
 
yes you may peal the tape back and get some joint compound behind it and use you blade and smooth back out. I never heard of wetting the tape but what happened was you didn't have enough mud behind your tape. Dry taping looks very simple but really isn't there is a knack to it and with time you will get it. It take about 3 coats to do this and done right you will have minimal sanding. Your first coat use a 4" or 6" blade and make sure you have no dry spots under your tape. I use the compound right out of the bucket but I do use a drill and mixer to mix it well. Second coat I add some water to it and mix well and use a 8'" or 10" blade the last coat I add more water mix and use a 12" blade sometimes it will require a 4th coat. I only sand at the end or sometimes between 2nd and 3rd coats. Some people us liquid soap instead of water, the kind of soap that you hand wash dishes with. I don't do this because I do well with water. I also use buckets with green lid and not the light weight compound. The green is a little harder to sand but the light weight scratches and dents just buy looking at it, also that is just a expression I use it really doesn't scratch just looking at it but you can see all your sand marks and if you bump something in to it, it will dent very easily. As for your corners first coat I use a 4" blade and coat both sides put tape in the use a corner blade, second coat I use a 6" blade and only do one side the next day, providing all is dry I do the other side of corner. You may use the corner blade for all coats but you also have to use your 6" blade to feather out your corner. Take your time and the more you do this the easier it becomes. You won't be a pro your first time and you will find out there is a knack for this. Good luck hope so of this helps.

Joe~~
 
Great explination on that there muddin job Spaz. :)
One other thing you can do when the tape bubbles is to go over it with a wet sponge, sometimes this will wet it enough to get the tape to stick back on.
 
Hopefully tomorrow will be more successful. Joe on the corners, do you add compound to the back side of the corner knife/tool?
 
no I use the 4" blade and corner tool without compound
 
:( I got the green lid joint compound. It was much thicker. I wasn't able to get the tape bubbles to flatten out, even after putting more mud under it. I broken down and took out the tape and started over with the mesh.

More sanding, mudding, and mopping today. We're going to hit the beach to clear our nose and lungs tonight.

What do use for the outside corners? - metal, vinyl, paper bead
 
Sometimes it does not go as planned.
Go for the metal, it can take the best abuse from moving the furniture.:D
Good luck.
 
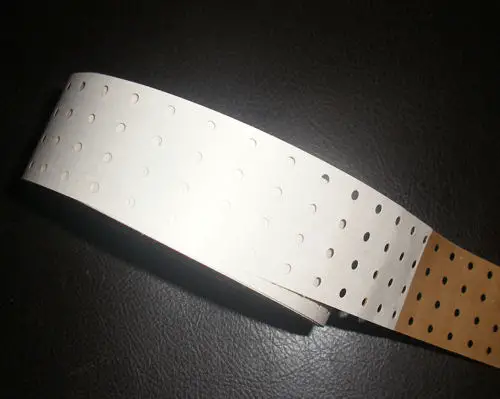
I am surprised nobody has mentioned the self sticking tape that has holes in it. It looks like this:
self-adhesive-drywall-tape.jpg


I can't remember the brand, but I believe it is sold at Home Depot and Lowes. It really cuts down on the amount of compound you use, sanding you do, and time. If you are a professional making money, it will pay for itself over and over again. If you are a DIYer, it will save you a ton of frustration.
 
Some trick i have learned from doing way to much drywall filling. I use paper tape and take a small bucket, plastic and cut slots in both sides just at the bottom so you can pull the paper thru. with the paper started fill the bucket with filler.When you pull the paper thru it will have 1/16" of filler on one side, ready to put on the wall and kniff into place do not add more at this point.
For out side corners I use papered beads and coat the inside with filler and smooth into place with damp sponge or rag.
If you hang board like I do you want to fill the big gaps first before you tape it.
Alway scrap the rough off before the next coat and for the rest I think spaz 2965 has it about rights but always seems to take me about 4 5 trys before I give up and paint it.
 
Back
Top