Under cabinet range hood

House Repair Talk

Help Support House Repair Talk:

This site may earn a commission from merchant affiliate links, including eBay, Amazon, and others.
Joined
Feb 26, 2016
Messages
16
Reaction score
6
I have a huge gap now where a microwave used to be. I need to finish the wall and put a vent up there I think. I'm not putting another giant microwave up there.

1) What are my best options for fixing that hole in the wall?

2) I can't make a hole to the outside because of where the oven is so I'm not sure what options I have. if I had my choice I would flip the kitchen so I could have a vent to the outside but right now that is not even remotely an affordable option.

Any one have an under the cabinet range hood?

IMG_20160225_184956009.jpg


IMG_20160225_185003123.jpg
 
It looks to me like it was wired for a the hood you are talking about and some one dug out the wire to take it above to an outlet for the microwave.
So you can use that outlet for a junction box and run a wire down for the new hood, buy the hood first so you now where to bring the wire to.
You will just need the wire sticking out the wall as the hood will have it's own box for the wires
Cut yourself a nice rectangle piece of drywall that will cover that hole. Hold it up over the hole and mark out so you can re cut that hole to fit your patch
A couple chunks of wood slid into that hole and screwed above and below and then install the patch and fill.
Then you are ready for tile, good luck.;)
Make sure the hood you buy has a charcoal filter and then there will be a vent in the front that will have to be opened if you don't vent it to the out side.
You should discuss how to vent to the outside so you know how easy or hard that would be, before you decide not to do it.
 
Thank you for the advice.

There is an outlet up above and a little hole for the cord to go through but I'm going to have to relocate the hole because it needs those wood anchor pieces? When we removed the microwave there was a live wire running along that hole. I called an electrician and he terminated the wire at both ends because the outlet was already up top.

I have never done the drywall bit should I be worried a bit more about the wiring back there before I go to cut anything? Do I just wear a rubber type glove and feel back there before I cut that section out and re-anchor a new piece?

I'm a total newbie here so I just want to make sure I'm doing the right thing in the correct manner before I go all gun ho.
 
[ame]https://www.youtube.com/watch?v=K37G2j0K8BA[/ame]
[ame]https://www.youtube.com/watch?v=sSUCUkKk11E[/ame]
 
Your welcome, you will be taking the front cover off the hood for using without a vent to the outside, keep that cover for when you decide it should be vented to the outside.;)
 
I do, I think one of the bathrooms is right above it.

That would make ducting pretty tricky. I think your right in trying the charcoal filter first.
You would have to find a bay between studs upstairs with out plumbing or a bay between floor joists to run across the ceiling of the kitchen but then you might find bathroom plumbing there.
 
That would make ducting pretty tricky. I think your right in trying the charcoal filter first.
You would have to find a bay between studs upstairs with out plumbing or a bay between floor joists to run across the ceiling of the kitchen but then you might find bathroom plumbing there.

Yea, that would be quite a project. Like I say maybe one day I'll remodel. Here's my progress so far with the wall. I was vetoed by the husband on patching the dry wall but he came up with a solution I'm okay with.

We bought a sheet of aluminum and he put it up there with the studs. I'm somewhat irritated that there are 3 holes in the middle where he tried find the studs. However, I covered them with waterproof caulk and the hood should cover the patched holes.

My husband didn't put the sheet flush to the tile and there was exposed chipping dry wall that was dusting all over the stove. So I again took the waterproof caulk and layered in the gap between the aluminum and the tile. That way I don't get dry wall seasoning on my food, I probably would have put caulk there in the end anyway.

I'll post it when the hood finally goes up probably this weekend. Or I'll post before then if I run into issues.

hole.jpg
 
Last edited:
Should have been easy to find the studs with the big slot in the wall behind. ;)

Looking good though so far.
 
I have a range under a cabinet. There is a duct cut in the middle of the cabinet for the ductwork up into the attic.
tumblr_lnt6rlSCSs1qhfuqwo1_1280.jpg


I think that having a cabinet there is a good use of space. Although, you could make it in to a shelf above the range if you go with charcoal filter instead of having a duct.
 
Zannej, are you comfortable with wooden shelves directly above your range?
Yes. It's a crappy electric range and I'm hoping to replace it with an induction burner one eventually.
The wood is solid oak-- not some crappy laminated mdf crud.
 
Crappy or not, I would be concerned about the combination of heat & wood. Not to mention what could happen from a little cooking mishap.
Until you mentioned it, I had never even thought about it. Those shelves have been there for over 25 years and thus far there haven't been any problems. *knock on wood*
Hopefully there never will be.
It probably wouldn't be a good idea to have that over a gas stove.

I hope we hear back from welcome_to_my_house on what she decided to do.
 
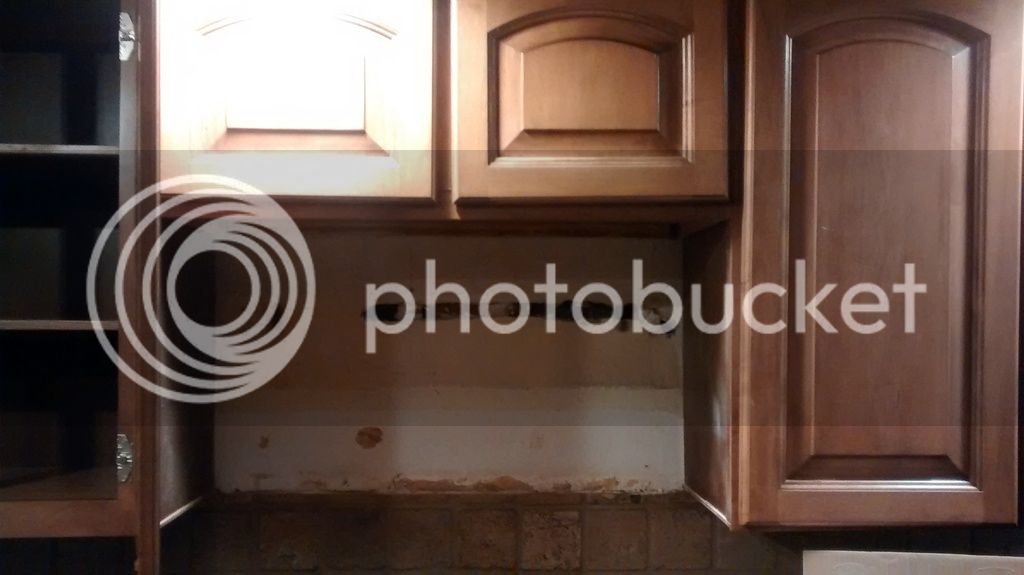
This was quite the saga.

First weekend.

- I bought a two by four when I should have bought a one inch thick piece of wood instead. That ate up a weekend. I even bought a saw which I did end up using on the correctly sized piece of wood.

Second weekend.

- I didn't realize I need to pre-drill the wood screws at first so I tried to do that, well our power drill wasn't up to the task.

- I bought a new power drill, the right bits I need to pre-drill, then I tried to use the bit from the old drill and it wasn't right it was stripping the screws.

- I bought the right one, my husband helped by pre-drilling the wood and then put in one filler piece crookedly. The power drill ran out of juice, the battery went on the charger and well that was that.
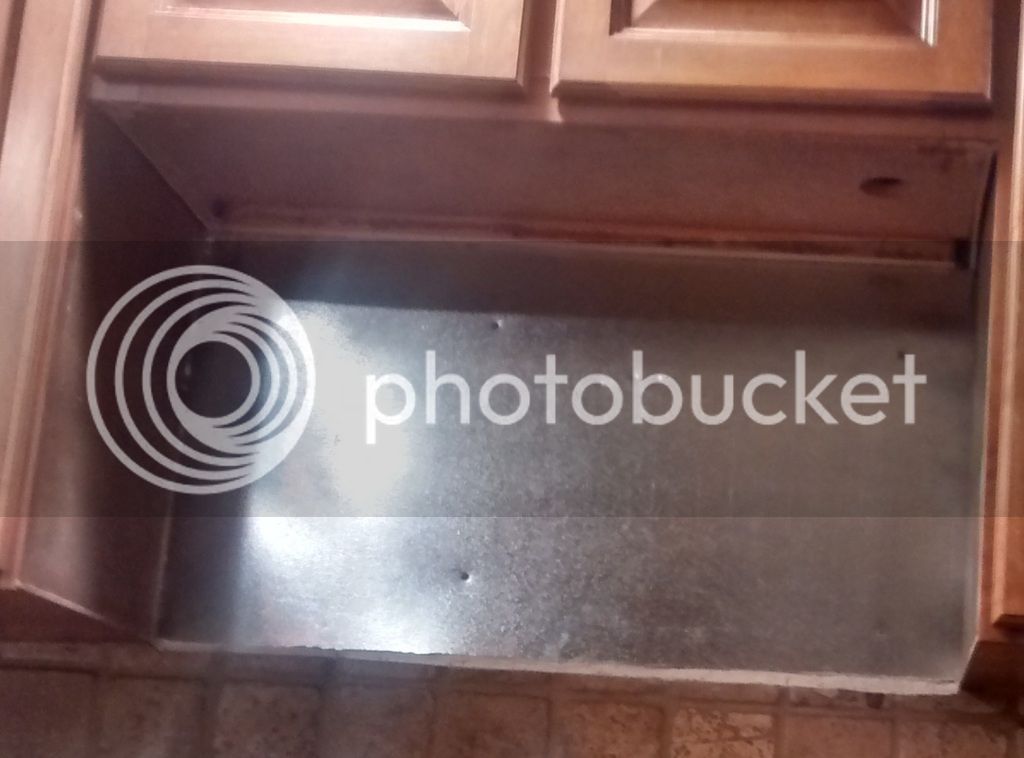
Third weekend:

- I put the second piece of filler wood in there, straight. Then I tried to make the marks for where the support screws should go. I couldn't hold up the hood by myself and mark it even thought it doesn't weight more than 5 pounds I just have circulation issues. I didn't want to deal with pre-drilling again since I'd have to do it make the cabinet wood and the filler wood flush again. So I bought some self-tapping screws and some jack stands.

- My husband woke up and tried to get the screws in the right place. When that didn't work out I asked him to do the electrical part. Big surprise we weren't counting on for some reason the hood didn't come with the cord. So we ordered the cord online and another weekend was shot.

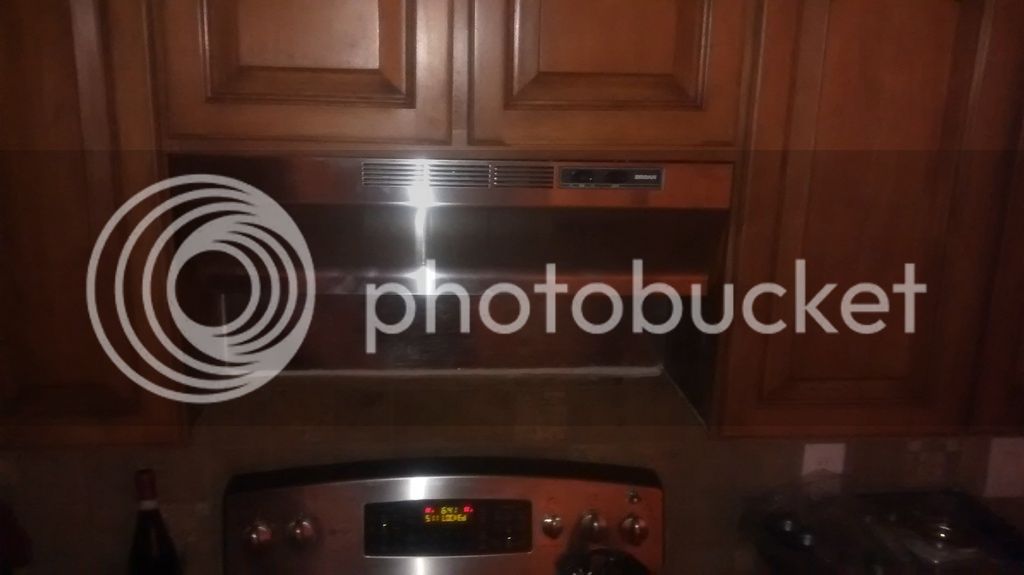
Fourth week into weekend:

- The cord came in and my husband got it all hooked up.

- We tried to get the screws all set again but the way the wood is under the cabinet made the whole thing a pain. Also the cord made it so we couldn't put the hood flush under the cabinet so we needed to make another hole.

- This weekend I bought the wood drilling bit for so we could make a new hole in the cabinet. My husband got some washers to put over the keyholes in the hood and around the self tapping screws so the damned hood could go in despite the issues with the way the everything was set up under there. Finally we are done and everything is secure.

I'll get a better pic later. I was just so excited to be able to vent the smoke as we had to run the self-clean on the oven since it was so dirty from the people who lived here before but now we're not smoking out the house. :)

IMG_20160327_194213038.jpg
 
Last edited:
Thanks for the update! Ooh, very nice upper cabinets. Sounds like it was a pain, but the end result looks great!
 

Latest posts

Back
Top