What can I do to save money on a new walk-in tile shower?

House Repair Talk

Help Support House Repair Talk:

This site may earn a commission from merchant affiliate links, including eBay, Amazon, and others.

JoeLink

Well-Known Member
Joined
May 4, 2014
Messages
58
Reaction score
5
I'm currently renovating my first home, a small condo. I've removed the tub/shower combo, and I plan on replacing it with a walk-in tile shower. I don't plan on using expensive tiles, or getting too fancy with it in general, but I do want it to look nicer than your average bathroom and somewhat upscale. I'm not looking for the cheapest, I'm looking for the best value.

I'm alright at DIY projects, but since this is an upstairs condo and we're dealing with water, I'm thinking I should hire a pro. I want to do whatever I can to mitigate my risk of water issues. I want the tile to run up to the ceiling, and I'll also need the rest of the floor tiled.

I'd like to know what, if anything, I can do myself to save money. I also know every market is different (I'm in Portland, OR), but I'm hoping to get a ballpark before I start requesting estimates. I'll be reinforcing the subfloor with another layer of 3/4" plywood, which is what is down there now. The size of the shower will be 60"x32" (about 85 square feet).

Pic of the space, and the current condition.

csJXp84.jpg
 
A lot depends on exactly what you want and your comfort level and abilities when doing projects. Are you wanting a tile floor in the shower or you thinking about buying a shower base and having tile above the base? Will you want the shower drain in the middle or leave it at the left side where it is now? Some plumbing will be needed for whichever way you go. If you are going to tile up to the ceiling the the rest of the drywall will need to be removed so concrete board and water proofing can be applied behind the tile. Tile systems are not waterproof. The waterproofing must be applied before the tile and grout are added. Are you going to put radiant heating under the tile in the rest of the bathroom? A nice option but another cost. Will you lay the tile on the floor outside the shower yourself? If so you need to think about hardboard under layment, thinset and grout in addition to tile. I would change and relocate the shower valve, more plumbing. Are you going to update the vanity, the vent fan or anything else in the bathroom while you are in there? Be a shame to have a nice new shower and have the rest of the room be well used. I don't know the labor rates or material costs in your area, but bathrooms are always expensive. Only kitchens are worse. Don't know if this helped at all probably not. Good luck. Holler if you have more questions.
 
A lot depends on exactly what you want and your comfort level and abilities when doing projects. Are you wanting a tile floor in the shower or you thinking about buying a shower base and having tile above the base? Will you want the shower drain in the middle or leave it at the left side where it is now? Some plumbing will be needed for whichever way you go. If you are going to tile up to the ceiling the the rest of the drywall will need to be removed so concrete board and water proofing can be applied behind the tile. Tile systems are not waterproof. The waterproofing must be applied before the tile and grout are added. Are you going to put radiant heating under the tile in the rest of the bathroom? A nice option but another cost. Will you lay the tile on the floor outside the shower yourself? If so you need to think about hardboard under layment, thinset and grout in addition to tile. I would change and relocate the shower valve, more plumbing. Are you going to update the vanity, the vent fan or anything else in the bathroom while you are in there? Be a shame to have a nice new shower and have the rest of the room be well used. I don't know the labor rates or material costs in your area, but bathrooms are always expensive. Only kitchens are worse. Don't know if this helped at all probably not. Good luck. Holler if you have more questions.

Thanks for the reply. My hope is that as I learn more I'll get a feel for where I'm at in both my comfort and my abilities. These posts really help!

I originally thought I wanted a tiled base, but I think a pre-formed base with tile above might be the way to go. It seems to me like it'd be less likely to leak, safer considering it's a second floor condo. Maybe a little cheaper too, but I'm not sure.

The drain location doesn't matter to me much, but that might change as I look at examples.

Is the concrete board screwed directly into the studs? Is this the same stuff that'd be used over the plywood subfloor? How is it waterproofed?

I don't think I'll be putting in the radiant heat, as it'd likely be cost prohibitive.

I was planning on having the same person who tiled the shower do the bathroom floor as well. It's such a little space that it shouldn't add much to the cost, and I want large standard size tiles.

What is the reason for changing and relocating the shower valve?

I will be definitely be doing work to the rest of the bathroom, including replacing the vanity and the exhaust fan. I agree, it would be a shame if I stopped with the shower.
 
OK, First you need to find a shower base that you like and get it there so you can adapt your drain plumbing to work with it. Even if you want a plumber to do that job he will likely want the shower base there. You said the shower area will be 60" x 32". When buying/ordering the base make sure the rough in dimensions will fit the opening you have. You can shim walls out, but trying to make the opening bigger to accommodate a base that is to big is a much tougher job. Follow the installation instructions carefully. They may very well require you to put some kind of concrete material under the base to level and/support it, depending on exactly what you buy.
Next screw the concrete board directly to the studs with the screws intended for the concrete board. Typically you use 1/2" concrete board on the walls to match the drywall thickness. That way when you marry the shower walls into the drywall everything is the same. I try to estimate where the tile will end and hold the concrete board slightly back from there. The water proofing can extent onto the drywall. If you have to replace any drywall use greenboard (a mold resistant type of drywall). Your tile will then be applied over the concrete board and the wall painted up to the tile.
There are different ways to waterproof your shower before applying the tile. I use a product called Red Guard that I get at Home Depot. After your concrete board is hung, get some mesh tape used for the concrete board. Apply to all the joints in your concrete board (it is self adhesive) and then apply a thin coat of thinset (the concrete stuff you use to apply the tile later). The Red Guard goes on with a roller or a heavy brush. Again follow the directions on the container as to thickness and coats needed. When dry you should have a waterproof surface on which your tile can be applied. When you hang your concrete board it should overhang the edge of your shower base and some caulk may be required. Follow directions carefully for sealing your concrete board to the shower base. The waterproofing step is critical to the outcome of your project.
For the rest of the tile on the floor of the bathroom you will probably only need 1/4" concrete board. This keeps the floor from becoming too thick and this hardboard is supported by your 3/4" plywood. Generally a layer of thinset is placed under this concrete board to level the floor and eliminate any surface irregularities. The thinset is put down the board is laid into it and then is screwed down again with screws especially designed for that purpose. When dry the tile is applied on top.
Depending on the age and condition of the shower valve I would consider replacing it. If it appears to be in good shape at least put a new kit in it so it will not trouble you later. As far as relocating it, it was installed for a bathtub and is too low. It also has the tub spout plumbing that needs to be remove and capped off. The water needs to be shut off and the tubing cut and changed to raise it. Not a huge deal, but I think you will be happier if you do it.
 
Last edited:
Because of the 24" on center joists the thicker backing on the floor might be better, other than that ,what he said. And he said it very well.
 
OK, First you need to find a shower base that you like and get it there so you can adapt your drain plumbing to work with it. Even if you want a plumber to do that job he will likely want the shower base there. You said the shower area will be 60" x 32". When buying/ordering the base make sure the rough in dimensions will fit the opening you have. You can shim walls out, but trying to make the opening bigger to accommodate a base that is to big is a much tougher job. Follow the installation instructions carefully. They may very well require you to put some kind of concrete material under the base to level and/support it, depending on exactly what you buy.
Next screw the concrete board directly to the studs with the screws intended for the concrete board. Typically you use 1/2" concrete board on the walls to match the drywall thickness. That way when you marry the shower walls into the drywall everything is the same. I try to estimate where the tile will end and hold the concrete board slightly back from there. The water proofing can extent onto the drywall. If you have to replace any drywall use greenboard (a mold resistant type of drywall). Your tile will then be applied over the concrete board and the wall painted up to the tile.
There are different ways to waterproof your shower before applying the tile. I use a product called Red Guard that I get at Home Depot. After your concrete board is hung, get some mesh tape used for the concrete board. Apply to all the joints in your concrete board (it is self adhesive) and then apply a thin coat of thinset (the concrete stuff you use to apply the tile later). The Red Guard goes on with a roller or a heavy brush. Again follow the directions on the container as to thickness and coats needed. When dry you should have a waterproof surface on which your tile can be applied. When you hang your concrete board it should overhang the edge of your shower base and some caulk may be required. Follow directions carefully for sealing your concrete board to the shower base. The waterproofing step is critical to the outcome of your project.
For the rest of the tile on the floor of the bathroom you will probably only need 1/4" concrete board. This keeps the floor from becoming too thick and this hardboard is supported by your 3/4" plywood. Generally a layer of thinset is placed under this concrete board to level the floor and eliminate any surface irregularities. The thinset is put down the board is laid into it and then is screwed down again with screws especially designed for that purpose. When dry the tile is applied on top.
Depending on the age and condition of the shower valve I would consider replacing it. If it appears to be in good shape at least put a new kit in it so it will not trouble you later. As far as relocating it, it was installed for a bathtub and is too low. It also has the tub spout plumbing that needs to be remove and capped off. The water needs to be shut off and the tubing cut and changed to raise it. Not a huge deal, but I think you will be happier if you do it.

Thanks for the long post.

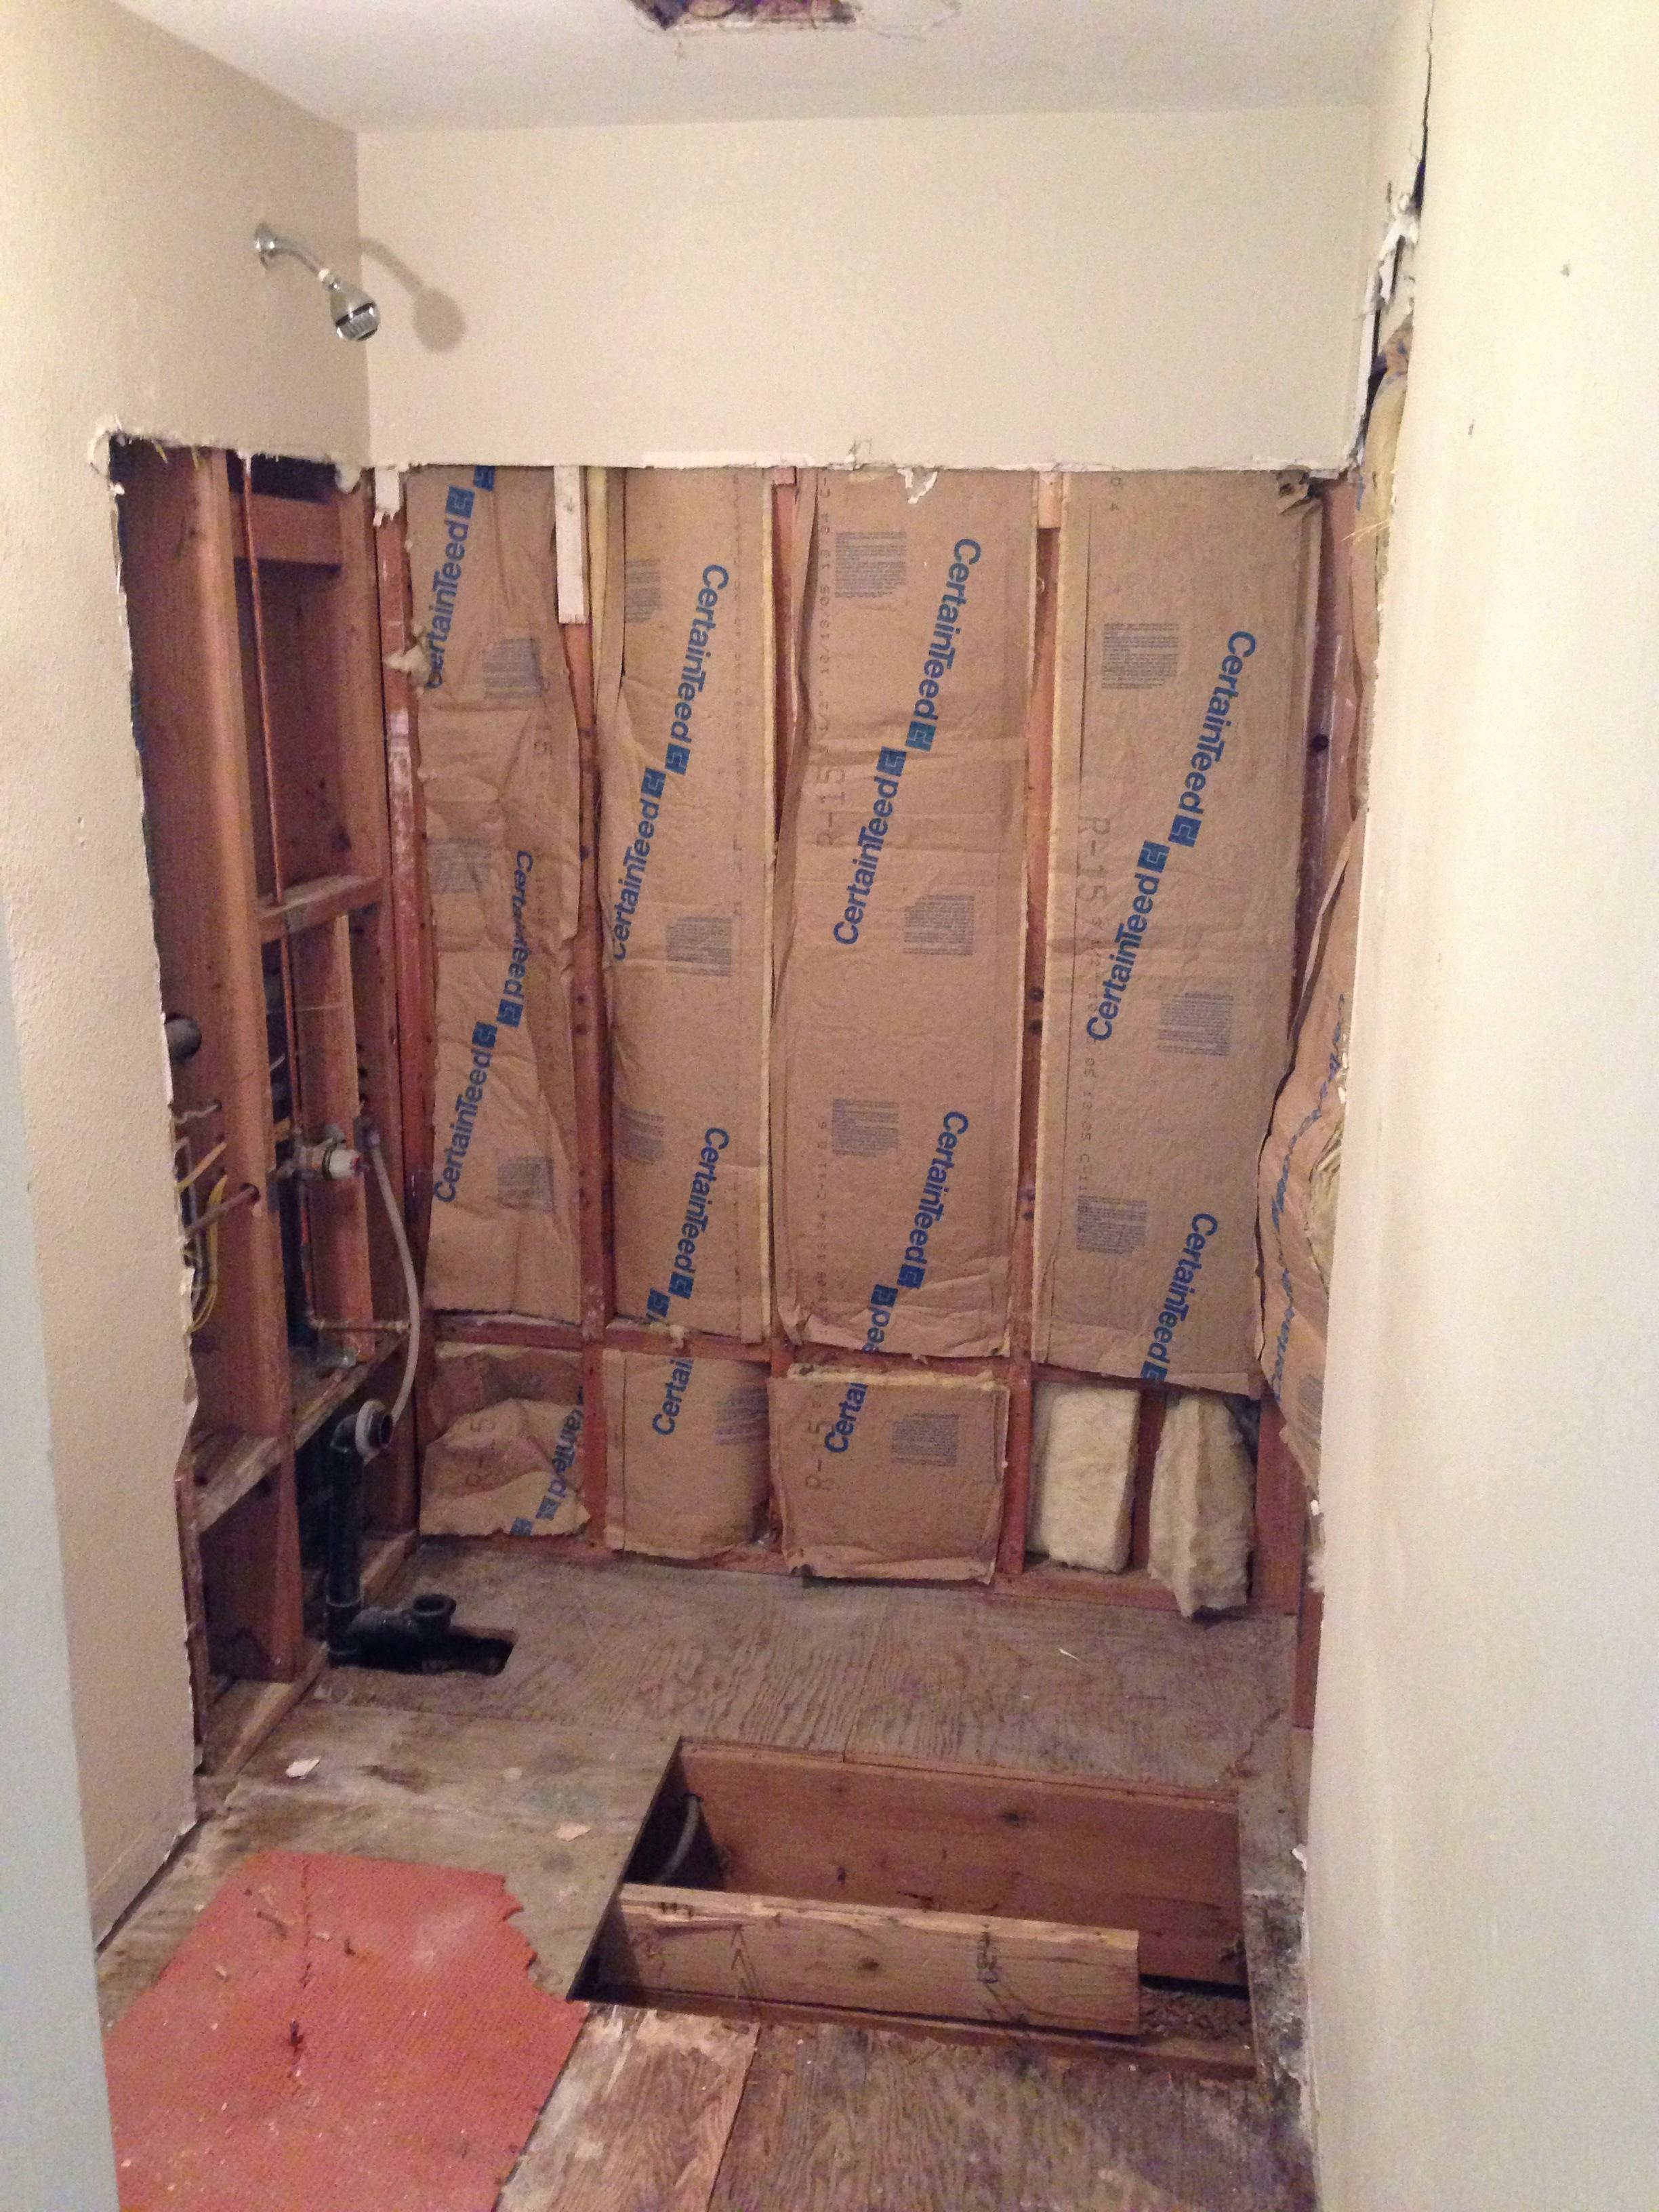
It should fit perfectly between the existing studs, but I'll be sure to measure again. I'll also check the installation recommendations about what they suggest goes under it. What are the differences between a low end and a high end base, or are they about the same?

I've been told I should remove the existing drywall from the bathroom and replace it with green board, and I've been told normal drywall is fine if used with a bathroom paint. What do you recommend? I'll do it if it's recommended, I plan on owning this place forever. I could replace it all at once, green board where the drywall is and cement board where I'll be wanting the tile. Thank you for the waterproofing instructions, very easy to understand.

When laying the concrete board on the floor, with the thinset underneath, how do I ensure that the floor is level? With a level? :rofl:

I was going to lay another layer of plywood because there are two spots where the subfloor is *slightly* spongy, but this could be due to loose nails going into the joist. I was told if I laid down another layer and screwed it into the existing plywood, but not the joists, that it'd be fine (and it's a whole lot less work than cutting out the existing subfloor). Will the cement board be sufficient? Should I maybe go with a 1/2" cement board?

I hadn't even thought about the shower control configuration or the spout, this is why I ask so many questions! If it's being re-configured anyhow, it does make sense to me to replace it.
 
Shower bases are like most things. Too cheap is probably not the way to go, but you won't necessarily need the very top end either. The lower end ones are usually all plastic, not very rigid and thin. I would suggest doing your research and if possible seeing an actual example. If ordering, see if you can find one where it is rated by actual users of the product.
If starting from scratch I always use green board in a bathroom. In your case, if there is any wiring adjustments to be made or any other reason you will need to penetrate the drywall I would remove the current drywall and replace with green board. Sometimes by the time you patch around the new shower you are just as well off the tear off all the walls and start fresh anyway. It depends on the size of the bathroom. Another thing to consider before doing anything with the ceiling is what is above you. You said this is a condo. Is there another unit above you which will require double 5/8's drywall on the ceiling as a fire stop? Just more to consider.

As far as the floor outside the shower, level is good but flat is most important. Tile, especially the larger ones, are not forgiving when it comes to a floor with humps in it. If your floor is slightly out of level but is flat, that is not an issue. If it is level, but resembles a roller coaster track that is not good. There are leveling products that can be applied to fill in holes and get the floor flat before putting down the cement board. Small deviations can be removed as you put down the cement board with the thinset.

Any place you have movement under tile will cause you issues later. The 3/4" subfloor must be tight without movement. Applying another layer of 3/4" plywood over the existing subfloor will definitely stiffen the floor but is going to cause you to have a finished floor thickness of about 2 1/4". Are your floor joists on 16" or 24" centers? Are the "spongy spots" over a joist or between joists? If over joists use coated screws and screw the subfloor down tight as long as the plywood is solid. If between joists I think I would cut out the floor and replace. Then 1/2" concrete board might be the way to go. When you get finished the aim is to have a solid flat surface to apply the tile and no movement. You can also use a polymer fortified thinset. This thinset is supposed to be able to take a little movement. It is more expensive but just another insurance policy toward future problems.

I have a question. What is going on with the floor joist that does not go all the way to the right wall where the floor is missing in the shower area? I would suggest fixing that as well, but I can't really see why it is missing.

Like I said bathrooms are a small room with lots of things to think about. Hope this helps. Keep asking questions before hand so you are not sad later.
 
Last edited:
If it were my bathroom I would probably just re-deck (tongue and groove) the entire thing. Looks like you are almost half way there anyway. Glue the decking (3/4") down to the floor joists and sink some screws in it to eliminate squeaking. As for the shower pan I would highly recommend a solid surface pan instead of a tile pan or fiberglass unit. Tile pans are high maintenance (lots of grout) and require a decent skill set to get them installed correctly. They also take a tremendous amount of time! Fiberglass showers are thin, cheap , flimsy and not worth what you pay for them. If they crack :mad:you are starting all over and the damage it can cause will be costly.
 
Back
Top