How to add shower - easy way?

House Repair Talk

Help Support House Repair Talk:

This site may earn a commission from merchant affiliate links, including eBay, Amazon, and others.

joannie

Member
Joined
Aug 5, 2009
Messages
19
Reaction score
1
I don't want to replumb cut into walls etc. and hire a plumber.

I have a standard size tub with walls on the side, & wall with a window on the back and cupboard on the other wall. The cupboard is above the toilet and also above the bathtub -- I don't want to lose the cupboard so plan to cut it so it only goes as far as the edge of the bathtub.

The faucet has a central control directly above the water spout. Is the easiest way to add a shower to get a spout on which I can attach one of those hand held showers and attach that to the wall?? after I remove the cupboard.

There is tile that goes up 3/4 of the right wall and partial back & to the cupboard on the left wall. I doubt if I can find tile to match the tile (plastic) there so not sure how to handle that.

I'd appreciate any quick easy ways to convert this bathtub to also be used as a shower. Thank you
 
Joannie, can we have pictures? I'm having a very hard time imagining it.
 
pictures would help. theres pros and cons to "doing it yourself". you can get a spout with attachment but pressure can become an issue, as well as other things. post some pictures so we can better visualize and lend help..
 
Is the easiest way to add a shower to get a spout on which I can attach one of those hand held showers and attach that to the wall?

Yes.

What you should do is Google "Moen" and find out their phone number. See if they have a "diverter spout" with an outlet for a hand held shower like this one:

1896372.jpg


With the above spout, when you pull the knob up, then water comes through the attachment for the hand held shower instead of out the end of the spout into the tub.

Now, the reason you want to get a Moen spout is because Moen diverter spouts have something called a "cup washer" in the gate that stops the flow of water through the spout. When this cup washer is positioned in front of the pipe the water is coming out of, it "inflates" with water and the lip of the cup washer moves forward to seal off the end of the water supply pipe. The result is that you get NO, ZERO, NADA water coming out the end of the spout when you're showering. All of the water comes out the shower head, and this is important to getting a decent shower. If you buy a fake Moen spout that's made in China, it'll look the same, and even say "Moen" or "Delta" or whatever on the packaging, but won't have the patented cup washer in it, and so it just won't work as well. With a lot of water coming out the spout instead of the shower head, the pressure of the water in the shower head will be less, and the velocity it comes out the holes in the shower head will be lower. The result will be the shower head "spilling" water on you rather than it "spraying" water on you.

The way to tell the spout is made by the Moen company is to look on the bottom of the spout. If you don't see the word "Moen" molded right into the plastic, then it's not a Moen and won't have that cup washer.

The way to tell how your spout attaches is to look on the bottom of the spout right near the wall for an opening in the spout like this:

19829d1242480985-how-do-you-replace-diverter-bath-tub-shower-slip-diverter-spout.jpg


If you see that opening at the bottom, you should find a set screw in there that holds the spout on to a copper pipe. If there is no opening, then your spout unscrews.

(If you have an opening, but you can't find a set screw, be aware that some companies are using the same spout "shell" for their "slip-on" spouts as they are for their "screw-on" spouts. So, if there's an opening, but no set screw, it probably screws on.)
 
Last edited:
I appreciate the info about Moen faucets. I see now where I can post pictures and will try to get those taken later today. I think that will also help showing the cupboard situation. Thanks
 
In order to post pictures, you have to have them uploaded onto a internet web site that anyone can access. If you just take a picture with a digital camera and load them onto your computer, they won't be availabe to view by others because other people don't have access to the files on your computer. Other people can only access the images on internet web sites.

Check out the website "Photobucket". It provides space for people to upload their own pictures so that anyone on the internet can see them.

In my own case, I use the "postcard" icon above to post pictures I find on the web, or upload photos onto my company's web site (I own the company), and link to those photos.

Also, if you're planning to convert your bathtub to having a shower, then you'd do well to clean any ceramic tiling grout lines on the walls with a phosphoric acid bathroom cleaner or toilet bowl cleaner first, and then seal the grout with an acrylic film forming grout sealer like this one:

lg_grout.jpg


You can find that acrylic film forming grout sealer here:

http://www.glaze-n-seal.com/sealers.html

You can also use "Gloss Sealer & Finish" made by Tile Lab and sold at Home Depot, but MAKE SURE to clean your grout first. This product doesn't cross link like the Glaze 'N Seal sealer does, and so you end up with a more permeable acrylic film. If you put Gloss Sealer & Finish over soap scum, then mildew will feed and grow on the soap scum because that acrylic film will be permeable enough to allow H2O molecules to pass through it. By cleaning that soap scum off, there will be no food for the mildew spores that may be on the grout you seal to feed on.

The reason why is that mildew won't grow on ceramic tile above a bathtub without a shower. The reason why is that, just like everything else, mildew need food to grow. Bar soap is made from plant oils (notably palm oil and olive oil) and that oil is converted into soap by reacting those oils with a strong alkali in a chemical process called "saponification". It is the remnants of the plant oil molecules in soap, soap scum, oil based house paints (linseed and Tung oil) and oil based artists's paints (poppy seed oil and walnut oil) that provide the food for mildew to grow on grout, walls and even priceless paintings.

So, once you start having showers, the water spray will be depositing soap on the grout and ceramic tile faces. Any mildew that feeds on the soap on the ceramic tiles will be washed off the smooth tile face by the force of the water spray. However, mildew will grow right in the surface porosity of the grout, making it hard to remove from the surface of the grout.

By cleaning the grout with a phosphoric acid based bathroom cleaner (to remove any soap scum and dirt that might be on the grout) and allowing the grout to dry overnight, and then coating the grout with an acrylic film forming sealer, you've covered that grout with a smooth film that the mildew can't hold onto. So, mildew will be washed off the grout by the force of the water spray just like it's washed off the glazed surface of the ceramic tiles.

AND, since it's the plant oil fragments that provide food for the mildew, look for a synthetic soap that advertises that it's "lipid free". Lipids are a family of organic molecules that include the fatty acids found in all animal fats and plant oils (and even animal oils like whale oil). It's really those lipids that are the source of food for mildew. By using a cleanser that's lipid free instead of bar soap, you can prevent most, if not all, of the mildew growing on your bathroom walls.
 
Last edited:
Well, you've got an attractive bathroom, and I can tell you now that you're likely to ruin it by adding a shower.

The water spray from the shower head is going to spray all over your window, and that water is going to leak into that wall at the bottom corners of the opening the window is set in. Not only will this cause the plaster behind the tile to deteriorate, but because this is an exterior wall, you're going to get the insulation wet. Insulation works by keeping air stagnant, so when insulation gets wet, it takes forever and a day to dry out because there are no air currents inside the wet insulation to help dry out that water. And if the insulation is wet, then any wooden studs in contact with that insulation are going to be continually exposed to moisture, and spells "wood rot". That is, the studs under that window could very well start to rot because they're in contact with wet insulation, and then if and when you're wanting to sell the house, some house inspector is going to tell his clients to pass on your house because the liklihood of wood rot under that window will be a source of mold spores that are unhealthy to breathe.

The soap dish you have is straight out of the 1960's. Inset soap dishes like you have there are notorious for being the source of leaks in showers.

If that cabinet is original to the house, then the finish on that cabinet is probably varnish. Varnish is nothing more than boiled linseed oil (a plant oil) with dried plant resins (called "copals") dissolved in it. Mildew is gonna feed on the varnish on those cabinets.

I suppose you could hang the shower curtain from the ceiling instead of on he walls.

You're bathroom was never intended to have a shower in it. If you add one, you'll need to address all of the above issues or you'll be needing to redo the ceramic tiling and possibly the wall under that window in a few years. And, repairing that wall might mean removing the tub from the bathroom or taking apart the exterior wall of the house from the outside.
 
Last edited:
Our idea was to do an "add-on-shower; attaching it to the faucet spout and then affixing it (shower head "like those hand held type") to the wall. on the left where part of of the cabinet is. We would try to find some sort of tile that would match.

The cabinet is an add on held on by screws but goes all the way to the ceiling from the area above the toilet to the other wall. My husbands idea is to cut the cabinet in half (lower part) to have only the cabinet above the toilet. We would put a plastic shower curtain "curtain" over the window.

I'm just not sure whether this will work out.

Thanks
 
Looking at the picture and reading Nestor's comments....

Wow, this wouldn't be a simple job at all.

When you read all the problems people have when a shower job isn't done properly, I just have to agree with him... Just adding a showerhead and a diverter for the tub is just asking for trouble.

That is, if you are talking about taking out the cabinet and adding a shower head up on the plumbing wall as high up as a shower head usually goes. So, I'm wondering, is that what you wanted to do? Or did you just want to add a hand-held shower sprayer you can use in the tub to make it easier to rinse yourself off with?

Disclaimer: I am not a professional anything (other than a teacher), so what I "know" only comes from having my own bathrooms redone.

There seem to be two ways to have a hand-held shower head.

1) There is the kind where the shower-head holder attaches directly to the pipe where a shower head would usually go. I have that kind right now. It was easy to do. I screwed off the shower head and screwed on the hose/holder attachment, and, voila, I have a shower head that I can either stand under or take off and use up close and personal, or on the dog if I am bathing it in the tub.

Of course, for you to use that kind, you would have to somehow get behind that wall and extend a water pipe up from the temperature control, remove the cabinet so the pipe can come out of the wall at the usual shower-head height.

1e234e85-0e92-4de3-ae92-fc5ec971914a_300.jpg


2) There is the kind that has the water coming in from another inlet and can hook anywhere you like on the wall. You would still need to get the water from the temperature control and bring it out through the tile from where you would attach the hose and then mount a hook for the hand-held sprayer. If you were to do this low on the plumbing wall, you couldn't stand under it, but you might be able to use it to better rinse yourself without getting it all over the place every time you diverted the flow of water. However, even if you were to manage to keep the window perfectly dry, there is still the problem of the soap dish...

This mount for the sprayer also seems to be an inlet for the water where the hose would attach, so you wouldn't have to put in a regular shower head first at the regular height. However, you would still have to extend the plumbing behind the wall from the temperature control to the new water outlet.
37-8012-Euro-WOB.jpg


OH! Wait! Look at this! No new plumbing required! The tub spout has a place to attach the hose built right in! I'm not sure who makes this though. It might say somewhere else on the page.
tub_diverter.jpg

http://homerepair.about.com/od/termsst/ss/shwr_hand_6.htm

So then you just need the hose, sprayer, and hook, all of which could be mounted right into the tile. you could also use a slider bar, but they are expensive and then you would run the risk of spraying that window again.

This is a picture of a hand-held shower holder that you could put right onto the tile where you would want it, low where you could get it while sitting, if that's what you were looking to do. There are many different styles.
41P2KUGg-AL._SL500_AA280_.jpg


But everything Nestor said, oh my gosh! so so so true! Water WILL go wherever it wants to, and that is everywhere it isn't supposed to! Even if you just want a sprayer for when you are in the tub, and even if you can keep it off the window and off the wood, you will HAVE to do something about the soap dish. I don't know if calking around it will do the trick or not.

A shower shouldn't leak even with no tile or grout at all, and all that has to do with how the surrounding wall is prepared first, which for you would mean a lot of remodeling.

They said it's ok to include a link to another forum, if I put it in quotes, so here you go, another place to get more information: "http://www.johnbridge.com/vbulletin/index.php:"
 
Last edited:
....<snip>....... We would put a plastic shower curtain "curtain" over the window.

I'm just not sure whether this will work out.

Thanks


I have seen this done successfully. Just add a bar parallel to the window wall and a few inches away. Hang your (window shower) curtain on the bar and pull it over the window before the shower is used. Naturally you need to make sure that the curtain dries out between showers.

As mentioned by others, if the shower hits the window, you will have problems.
 
Joannie:

If you really want to do this, then I'll give you some ideas on what I would do to make your bathroom as shower proof as possible:

1. Move your cabinets out of there so no water sprays on them.

2. Measure your window frame (outside to outside and top to an inch below the bottom of the wood sill. Buy a piece of thin plexiglass (1/8 inch should be fine, but 1/4 inch would be stronger). Fasten a piece of beveled wood to the top of the plexiglass. It should be as thick as the window frame sticks out from the painted wall surface PLUS twice the thickness of this kind of self adhesive magnetic strip:

366.jpg


The wood strip should be fastened to the INSIDE surface of the top of the plexiglass, and it should be beveled on top so that water that lands on it drips down the front of it rather than goes behind it. Paint that wood strip with an ALKYD paint first so that the silicone caulk you put between the wood and the plexiglass will stick to the wood strip.

Now, also put those self adhesive magnetic strips down the outside of both wood window frames so that you install that plexiglass by hanging it on top of the window frame and allowing it to swing downward so that the magnetic strips on the sides hold it securely in place.

The 1 inch extra length on the bottom of the plexiglass is to ensure that any water dripping off the plexiglass doesn't get into the wall at the grout joint below the window.

3. Look up "Adhesives" in your yellow pages and find out who sells a water proof tape, preferably a waterproof transparent tape. I would then repair any damage from moving the cabinet, prime the walls with an INTERIOR alkyd primer and paint over your walls with a paint meant for bathrooms like Zinsser's PermaWhite Bathroom paint OR use sizing on your painted walls and install vinyl coated wallpaper over the existing painted walls.

Now:
a) Bathroom paints have mildewcides in them that are highly water soluble, and that causes those mildewcides to migrate toward the wet, damp or humid side of the paint film. With water splashing on the paint, the mildewcides in your bathroom paint will be depleted relatively quickly, and you'll need to repaint relatively often to keep mildew from growing on your paint.

b) If you go the wallpaper route, put a strip of water proof tape straddling each joint in the wallpaper strips to keep the wall paper from loosening up at the edges.

In both cases, caulk the joint between the bathroom paint or wallpaper and the top edge of the tiles.

4. Cut a clear plastic bag along it's edges to make two plastic "flaps". Tape the top and one side of each "flap" over the soap dish so that the flaps overlap, but you can reach in between the flaps to retrieve the soap (if you decide to use bar soap).

5. Either take the towel rods out and caulk the screw hole you'll find under each end bracket, or caulk along the top half and both sides of each end bracket. Leave the bottom open so that any water that does get in can drain out. If there's a plastic or fiber anchor in the screw holes, drill those out with a 3/16 or 1/4 inch drill bit, and hopefully you won't damage any tiles.

PS: The tiling in your bathroom is made by a Canadian company called "Maple Leaf". If you go to any place that sells ceramic tiles, just ask for 4 1/4 inch square Maple Leaf tiles, and you should be able to order them in that same colour.

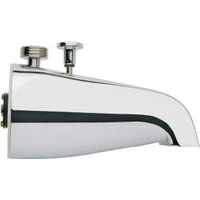
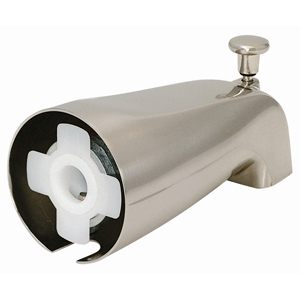
6. Caulk around the top of the Moen Escutcheon plate around your single lever Moen faucet handle. Ditto for the new diverter tub spout you eventually put in. In both cases, leave the bottom open so that any water that does get in can drip out.

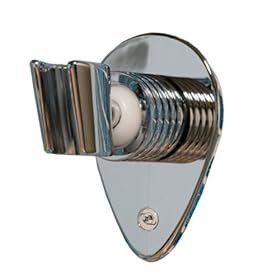
7. And, finally, if it wuz me, I'd use either Dow Corning 786 or GE 1700 silicone caulk to install a pair of "Splash Enders":

4071825.jpg


Or a pair of Spraymaids at the front and back of your tub:

shower2.jpg


to keep water off your bathroom floor. You just stick these up with the silicone caulk. I've never installed a Spraymaid, but I have Splash Enders in all of the apartments in my building except my own. I've tried several different kinds of bathtub splash guards, and Splash Enders are the only ones that seem to stay in place. Some of these kinds of products are made from plastic that silicone just doesn't stick to, so no sooner you put them in, you find that they're falling out. Splash enders stay firmly in place when you use one of the good quality silicone caulks mentioned above.
 
Last edited:
That's much information to think about, thanks. We were definately thinking about a shower head, not just the spray attachment as something to hose off. Rather than replumb which would have required tearing out the bedroom wall to get to the bathroom pipes we were aiming for something which we thought would be simplier -- it appears like it might not be as simple as we thought. We thought about putting something so the shower curtain runs all the way around the back and the front.

Well, actually at one time we were going to have the shower head come out of the cupboard (after we stopped the door from sliding)... Now talk about potential water problems. That idea was gone in a short while!

We'll have to go back through the thread and re read all the pro's and con's and try to decide the best way to go or to leave as is and put a shower in the basement, ugh. I'm not too concerned with the soap dish as long as we continue to keep it well chaulked.

Thanks.
 
Ah! A shower curtain all the way around, like for a claw-foot tub? I'm not one to say if that would solve all your problems, but here is a picture of how that might work.

This pic shows it attached to the wall on one end, but I've also seen pics of them attached only to the ceiling. I picked this picture because you can see that the plumbing for the shower head is NOT in the wall!

sring2b.jpg

Oval Shower Curtain Ring by Sunrise Specialty - Clawfoot Classics

as for finding tile that will match the adorable tile you already have, you might find it's nearly impossible. Have you thought about using a tile that is completely different? maybe something that picks up a color in the trim tiles? or even just white? Meh, I'm bad at that part, but if you are willing to add more tile, you might want to consider treating all the walls the same. Adding new tile has to be easier than ripping out what you have for the plumbing.

Someone else here or a local plumber might have some idea on how to use the pipe that serves the tub spout to allow you to attach external plumbing for a shower head like in the picture.
 
I think your best bet is to go to your local Bath Centers (where they sell stuff for renovating bathrooms) and inquire whether the companies that make 5 piece tub surrounds also make shower enclosures. If they do, they won't be ugly. They will be quite attractive, and that would completely avoid having to do anything risky with your existing bathroom.
 

Latest posts

Back
Top