All Season Room Flat Epdm roofing repair

House Repair Talk

Help Support House Repair Talk:

This site may earn a commission from merchant affiliate links, including eBay, Amazon, and others.

tk3000

Senior Member
Joined
Oct 27, 2010
Messages
386
Reaction score
41
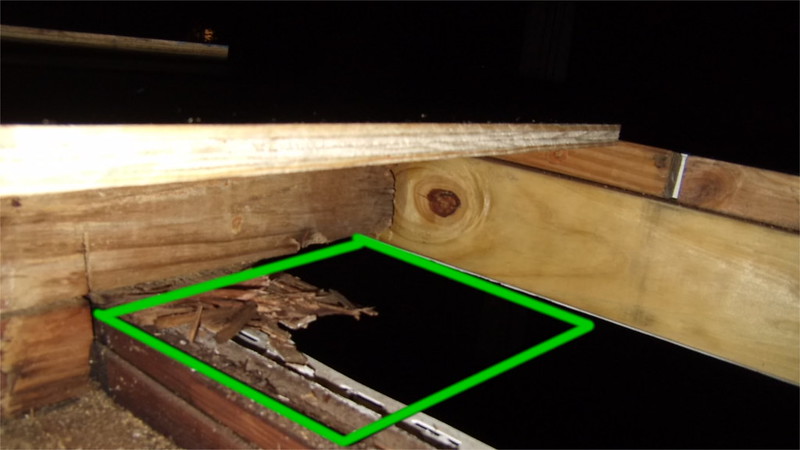
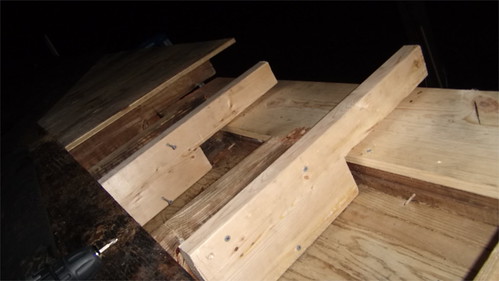
Sometime ago I posted about a all season addition to the house which has flat roof with epdm rubber membrane in a state of disrepair (ruptured epdm membrane + water infiltration + rotten plywood in some spots [specially outer edge of the ]). Few days ago I went over and when installing new fascia board (1x6) and backer support for fascia board (2 x 4) , shown below, I decided that it was about time to do a more thorough repair:


15324137381_5141e2cf49_c.jpg


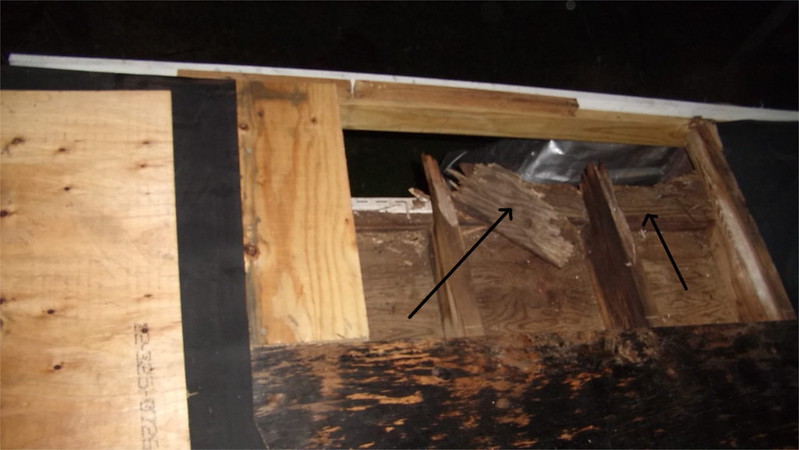
(shows new fascia primed/sealed in white, 2x4 support for fascia, and weak + rotten portion of plywood 1/2 removed)

It seems that they used super cheap nails which one could simply pull out due to corrosion. I am using 3" high quality exterior screws throughout.

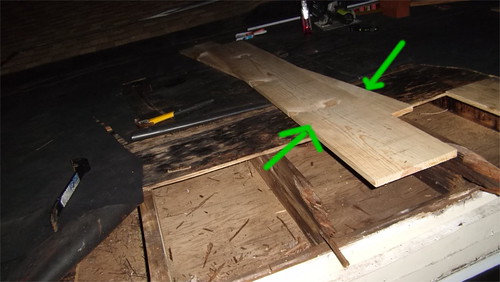
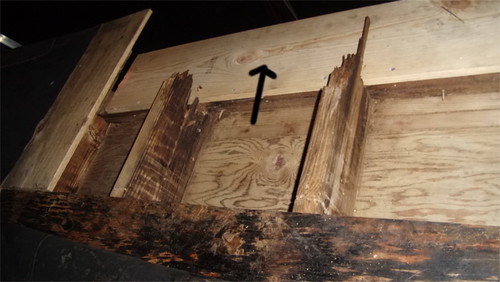
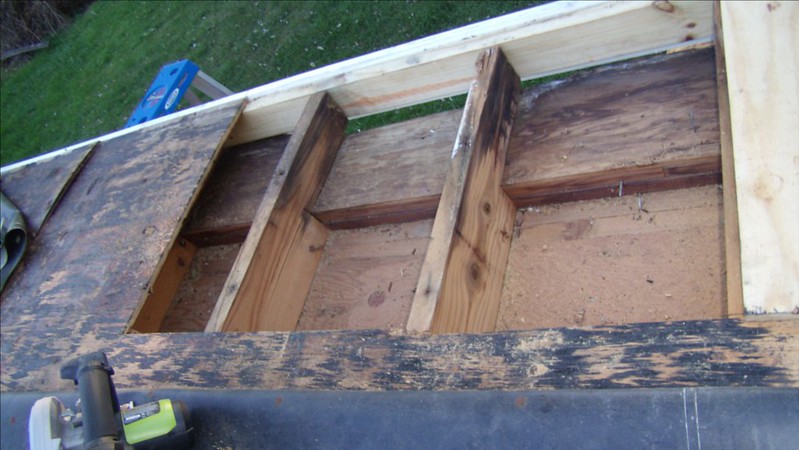
But the main issue I was faced with was to perform a perfectly straight cut with the circular saw on top of the roof in order to remove that bad roof sheathing. As a result, I got to much of a gap; and sometimes a not perfect even gap:

15140609098_c38a690bd4_c.jpg


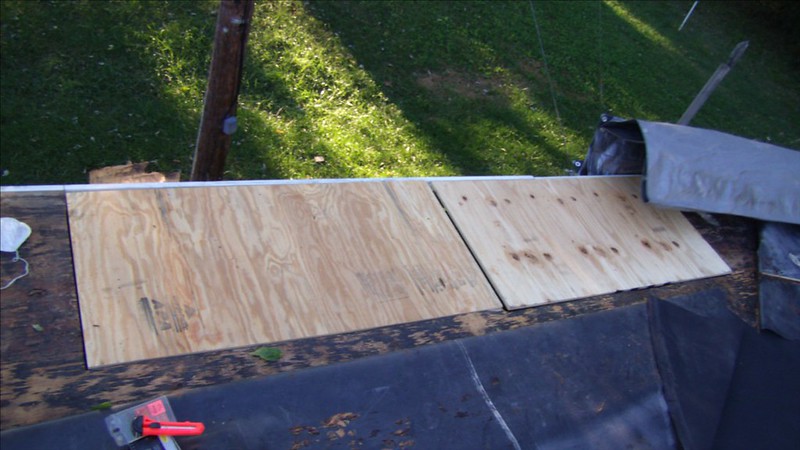
In some spots I may have 1/4" of a gap between the sheathing or even 1/2" which seems to much. Is there anything that can be done to mitigate this larger gap (caulking with some flexible sealant that would not compromise expansion and contraction of the wood?)?

Thanks
 
My suggestion would be to remove the pieces of y you have installed, get a full sheet and install one piece and install it the same direction as the other decking. You want it to run cross grain of the joists.
 
The nails only failed do to the water. Run the plywood the other way like olddog said and to cut a straight line in an awkward spot, tack down something straight for table of your saw to follow. There should be a 1/8 gap anyway, all around.
 
The nails only failed do to the water. Run the plywood the other way like olddog said and to cut a straight line in an awkward spot, tack down something straight for table of your saw to follow. There should be a 1/8 gap anyway, all around.

Yep, I know that it should be 1/8 gap, but cutting on the roof top trying to have a straight cut without much a guidance besides a level and a carpenters square was not enough to get a perfect cut. Also measurement were not as good as ones obtained in a table with everything clamped, etc. The end result is more gap and an uneven gap. The nails should not deteriorate that much though; high quality galvanized or zinc coated nails would not deteriorate like that.
 
My suggestion would be to remove the pieces of y you have installed, get a full sheet and install one piece and install it the same direction as the other decking. You want it to run cross grain of the joists.

Thanks for point that out. But due to circumstances I am with a small car and in order for the wood to fit I got it cut at the home center in 3 parts. Besides I am not doing the whole roof, just a small portion in the edge of the roof. I understand that for maximize the strength it should run cross grain of the joists; but would you that it is deal breaker?
 
[ame]https://www.youtube.com/watch?v=a7sjK9RCpRs[/ame]
Just use nails or screws to hold the straight edge in place.
Put 2x4 blocks under the upper edge and screw into them from above, that will make the sheets strong again.
 
https://www.youtube.com/watch?v=a7sjK9RCpRs
Just use nails or screws to hold the straight edge in place.
Put 2x4 blocks under the upper edge and screw into them from above, that will make the sheets strong again.

Nice video. But that is a controlled setup. I believe that the level is measured with relation to center of gravity of the earth, and the roof should have a slight slope; and that itself should cause some inaccuracy. But, then, nothing is perfect... It just have to be perfect enough to its intended purpose.

I did not remove all the epdm membrane, so unless I remove more of it; drilling would also imply perforating the membrane in some spots.

I read and believed that the the gap between 1/8 to 1/4 would acceptable, and even 1/2 should be ok. Since I do not much experience with roofing, etc, it is always good to double check and cross reference.

If you look at my first picture in the first post, you will notice (at the left upper corner of the pic) that part of the plywood warped probably due to lack of gap there.
 
Last edited:
I agree for most roofing the gap you have is OK, I'm not sure about this product, we will leave that to Oldog.
As far as st the straight cut I was thinking about something like an old fashioned yard stick, tacked down about 1 1/2 inches from the cut line and let the saw run along side that. And yes I do understand how hard it can be to get a straight cut when you are in an awkward spot.;)
 
I would recommend a different type flashing detail for your edge than the link you provided. Don't skimp on the weathered membrane cleaner. It's important to clean all edges that are to be bonded.

[ame]http://www.youtube.com/watch?v=2Tgg986c0wM[/ame]
 
I would just fill the crack between the sheets with something or cover over then with a strip of flashing if I was worried about the gap. I use automobile body filler for little jobs like that.
 
I would just fill the crack between the sheets with something or cover over then with a strip of flashing if I was worried about the gap. I use automobile body filler for little jobs like that.

Yep, I also use bondo body filler for my wood repair/filling needs!
 
I would recommend a different type flashing detail for your edge than the link you provided. Don't skimp on the weathered membrane cleaner. It's important to clean all edges that are to be bonded.

http://www.youtube.com/watch?v=2Tgg986c0wM

I am looking into your suggested method, but already bought the type of drip edge mentioned on the link. I like the extra protection of the membrane flashing.

Yep, I always scrap any old rubber sealing/caulking, clear the area water an detergent, rinse everything, dry it out, and apply primer when I am about to match the surfaces. Some section of the epdm membrane have been torn a part (I had to torn some section in order to replace the sheathing), so I patch the back and front of the membrane to reinforce it.
 
After you scrub with detergent get some weathered membrane cleaner. It's worth the cost.

Yep, I will look into buying some membrane cleaner too!

So far I have worked on the edges of the roof which have been subject to a lesser amount of damage. Now, I am tackling the worse part. The good thing is that the rotten and decay wood seemed to limited to the edges only, but then the thing at the worse part has rotten so much that it has basically vanished as shown below:

15190022048_d4b025ecb4_c.jpg


15189031670_39852f4596_c.jpg


From the pic above one can see there is a notch at end of the rafters wherein some wood board should fit assuming that the whole thing is uniform since there is such a wood board at the other less damaged portion of the roof edge, as shown below:

15324137381_5141e2cf49_c.jpg


I already covered and finished witht he the good portion of the roof, but it seems that the board would be 1x15. So I am planing on buying it to finish the that portion hopefully today.
 
It would be better if that lower wood was not there and vented soffet was, as long as that is outside the building.
 
It would be better if that lower wood was not there and vented soffet was, as long as that is outside the building.

Yes, I will install vent soffits later on. It turned out that only parts of the roof edge had such boards, and the sections missing it simply never had it (maybe they decided to save on wood at some point). Anyhow, I ended up installing some of the lower boards; but I will not install them throughout, just in some sections as shown below:

15374827806_6a1fab128b.jpg


15374827956_3d36f88acf.jpg


As noticed in the pic above, the end rails of the rafters in some case have been rotten into submission and simply vanished. So, I am installing new end rails in order to have better more support for the fascia board:

15374828006_646c8b6c01.jpg


That thing turned out to be lots of work... One issue I am having now is that the new plywood sheathing seems to be slightly higher than the old one (maybe the old ones shrank due to moisture, etc)
 
Plywood will seldem be thinner than it was new, it does come in many thicknesses sanded and unsanded.I would try again for plywood that matches, you don't need a ridge there.
 

Latest posts

Back
Top