Reframing window and cutting studs in existing Balloon framing construction

House Repair Talk

Help Support House Repair Talk:

This site may earn a commission from merchant affiliate links, including eBay, Amazon, and others.
You can remove the studs but when you re-frame and add a header, which I assume will be above the original window, you need to re-nail the sheathing to the studs and header. You shouldn't just let the sheathing float over the new framing which I guess will be 6 to 8 feet wide.
The other point was from an esthetic perspective. You have a 3 window bay on the 1st floor, your existing on the 2nd floor match. Putting 1 large window over the three will change the look of the house. I'm not sure I would do that....even as therapy.

I like the arguement about the big window.

He can toe nail header to the sheeting or put the header up one peice at a time and screw the first peice with 2 1/4 screws into the sheeting, if the sheeting is 3/4 plus.
 
Guys appreciate your comments. I disagree about the 1st and 2nd floors matching. They really don't even now, despite the 3 windows on the 2nd floor. Also there are other renovation plans in the works which I can share later and might shed even more light on this choice, but I think aesthetically the large window on the 2nd floor will look perfectly fine and compatible with the rest of the house. Also, the smaller windows are pretty much useless. Ultimately this is a design choice.

I'm not saying I'm putting in a large window as therapy. I think that comment is really counterproductive (and unkind) for this discussion.

Neal thanks for the advice on the header - I was thinking about removing some of the siding just for the purpose of nailing the sheathing to the studs from the outside. I know it's work but at least it would be covered with the siding material. Not sure yet how thick the sheathing is. Is there a toe nailing technique that I can use without the risk of damaging the materials behind the siding etc?
 
.

I'm not saying I'm putting in a large window as therapy. I think that comment is really counterproductive (and unkind) for this discussion.
Hmmm...It was you that referred to the project as therapeutic and that project is the window.
 
I would leave the old studs attached just as they have been. Only remove the part for the window header opening. If you want a few toe nails I would drill studs and use screws.

I put a bunch of new windows in the old house we have now. Circa 1890's and did them all that way. I get the therapeutic part of it.


Sent from my iPhone using Home Repair
 
Like Bud said nailing thru that old wood may be near impossible so screws might be the way to go. Toe nailing or screwing is just placing the fastener on an angle so the catch both peices of wood. Placement, angle and screw or nail length do have to be planned, but that's not rocket science. The two boards do have to be tight first as a toe will not pull it in tight, it will perm. set the gap if there is one.
 
Guys again really appreciate your tips, thanks a lot.
As I'm working on this part time (after my day job), I'm not moving very fast, but I have been able to make some decent progress in the last couple of days. I'll post pictures as soon as I complete the framing of the new window, hopefully this evening. Waiting for tax holiday in MA (this weekend) to buy the window and other stuff.
 
I use screws several different ways. Most everyone just run them in and bury the head and like Neal said if there is a gap between the pieces it will remain. The new deck screws have two different threads to help suck the boards together but I haven’t had the best luck with those screws. I have a few clamps I use a lot couple Irwin bar clamps and a big C clamp. I will quite often put a clamp on before I run the screws to hold the joint tight. I also will pilot drill the top piece at least the first screw so the screw will pull the pieces together. If I’m near the end of a piece and I feel it will crack with the screw I will pilot both pieces and even counter sink for the head in finish work on harder woods.

I know if I was a contractor up against a time line that might be a lot of extra work. One advantage of DIY you can take as long as you need to do a good job. Like you I’m always trying to do a little every night after work or try and find a free weekend to get a bigger job done. Taking your time I find has better results, there is something to be said for letting an idea soak in a day before trying it out. Lots of time I find myself coming up with a better plan after sleeping on it.

Bud the trick to having a screw pull wood together is the reach of the screw.
The reach is the distance between the head and the last thread. If the the reach is long enough the screw will spin in the first board and pull the second.
But nothing will help with a toe.
 
Bud the trick to having a screw pull wood together is the reach of the screw.
The reach is the distance between the head and the last thread. If the the reach is long enough the screw will spin in the first board and pull the second.
But nothing will help with a toe.


Reach is good and I do try and think about that when buying screws for decking or where you have a whole bunch of the same situation to deal with. The new deck screws have two different pitches of thread on the same screw kind of like a turnbuckle only these are both RH threads. The idea is if it screws into the bottom board faster than the top the gap will close up.

If you drill a hole in the top board first bigger than the threads of the screw any joint will close up toes included.

Another trick I have done to pull a joint together before screwing is to run a couple screws in half way and then put a clamp on them. Screw the joint and then remove the two screws. When I just did the decking the planks had some bend in them. I would run a screw into the joist about an inch from the plank I was putting down and then drive a wedge in to force the plank straight then screw it down.

I have a big old adjustable wrench that was my dad’s and I use it to twist studs straight before screwing. Sometimes that’s a two man job
 
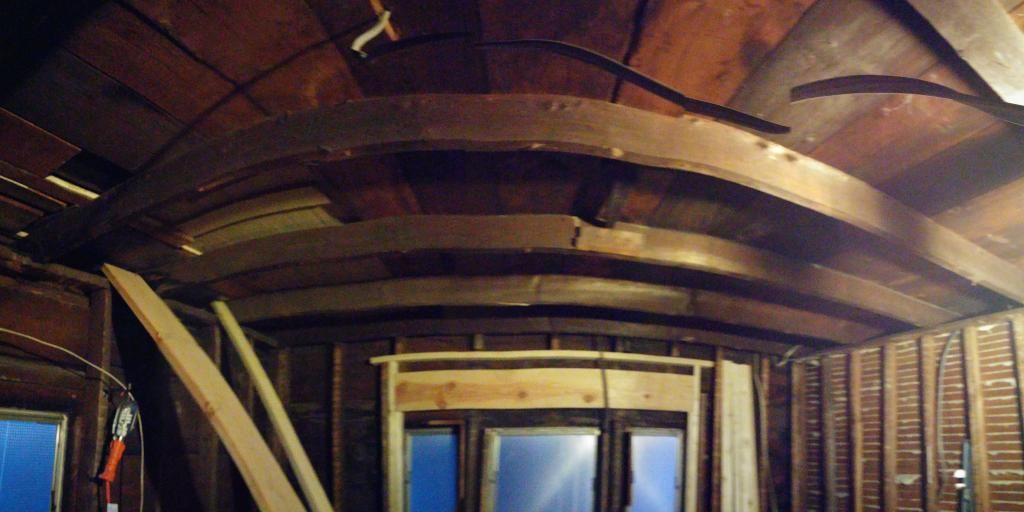
Guys, here's an updated picture:
http://tinyurl.com/qam969o

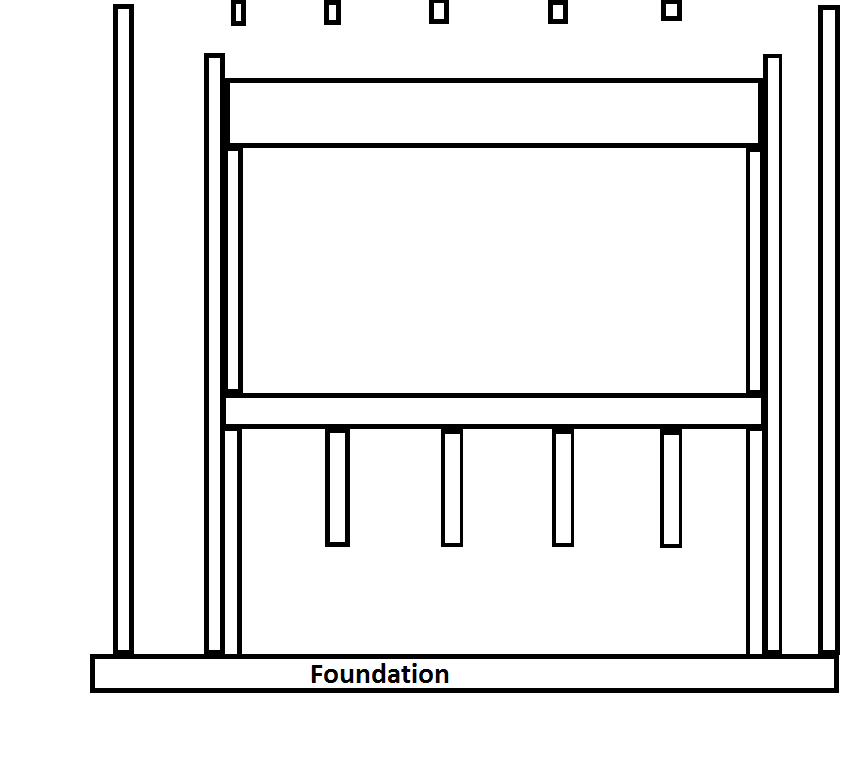
I'm going to refer to a few things, so I noted some numbers on the picture:
http://tinyurl.com/py9gajq

First - almost nothing in the pictures is nailed - so I can still play with it.
Also, I'm planning on adding one sill under the header and one over the 4x4.

1:
I put a 4x4 beam to serve as support for the future large window.
The studs in the middle are not studs - they are half loose and cut right below the floor level.
The beam rests on actual studs on each end. So this is definitely not a classic window framing. Any issues with this that you can see?

2: Behind the number 2 there are 3 pieces of wood.
The rightmost is the window stud, from the beam to the header.
The middle is a stud that I added, and nailed at the bottom to the existing stud.
The leftmost is not a stud, but a 2x4 that is nailed to the external board.

I plan to remove the leftmost piece. But the issue is that the new stud is not level. The stud below is also not level. And the stud to the left of all this, is also not level.
The degree of unlevel is not very high. But I was thinking about adding 2x4 pieces perpendicular to and between the new stud and the existing stud to the left. What do you think?

3: The header right now is longer than the 4x4 beam. That is because of the unlevelness of the studs. How big of a concern is this?

4: I was thinking of adding a long 2x4 spanning from leftmost stud of the wall to the 2nd rightmost stud of the wall, and then nailing the studs to it. Thoughts?
 
I'm still a little confused so I will just put it my words.
Your header #3 should be long enough to sit on top of studs that go all the way to the bottom and should be tight under the studs that have been cut above on the outside of that you add another peice to tie the header to the stud above and below the header together.

The ceiling joist above that is against the wall would serve as the temp support that Bud was talking about. If is attached to the studs.
All header must be supported with bairing points to the foundation
When cutting those outside studs just remove 9 1/4" to slide the header in.
Sorry if I didn't make this clear in the earlier posts.
 
I'm still a little confused so I will just put it my
words.
Your header #3 should be long enough to sit on top of studs that go all the way to the bottom and should be tight under the studs that have been cut above on the outside of that you add another peice to tie the header to the stud above and below the header together.

The ceiling joist above that is against the wall would serve as the temp support that Bud was talking about. If is attached to the studs.
All header must be supported with bairing points to the foundation
When cutting those outside studs just remove 9 1/4" to slide the header in.
Sorry if I didn't make this clear in the earlier posts.

Neal, let me clarify-
Here's what the structure is right now:
Currentframing.png
 
As you can see, all the studs have already been cut.
The studs that have been cut were carrying no load, and as it turns out, were not extending down (or up) too far.

The base of the window is 4x4, since there are no studs to support the middle of it.
Is that sufficient?

Do you see an issue with this structure lasting and holding the window or any weight that's placed above? (provided that I will extend studs from the header up to continue the ones that have been cut)
 
Last edited:
With the location of the bay below all the load had to be carried around before for the life of the home on the bottom. At the top any load has to be carried over, around and down thru the outer most studs that's what the header does. The 4x4 on the bottom has to just hold the weight of the window.

On the top I would have as Neal suggests run them from header all the way up or add some new ones now or some blocks to the new plate.

Bottom line is its worked for many years with less support and being the gable end of the house isn't seeing the kind of weight the load bearing wall is.

Sometimes framing in these old places isn't real pretty and doesn't end up looking textbook. You get a feel as you're going what needs beefed up and a little over framing is better than under framing.

Also keep in mind where your 16" centers are falling from whatever side your drywall will start at. The middle ones can be off but you need something at the 48" if you are running sheets up and down.

Make sure the sheeting is all attached well to the new framing.

I think you should be fine. Your work looks good so far. Thanks for sharing Looking forward to seeing more. Showing a project like this to the world isn't easy and it will help a lot of people going forward I'm sure.


Sent from my iPhone using Home Repair
 
Your drawing makes it clear. Looks good.
The two peiceas of header want to be nailed togethe 3 nails every 16", put them in seperatly so you can screw to the sheeting from the first one .
 
Good morning,

Thanks again for all the great advice and confidence thus far. It's been a huge help.
The windows should be arriving any day now. In the meantime I've been focusing on other parts of the room. Still need to nail together and screw the window framing.

I have another question, on floor + ceiling. I've stripped the ceiling and (most of the) floor. As it turns out, the ceiling and floor joists extend from one side of the house all the way to the other side. I'm gutting one room, and the joists extend beyond a fake wall.
Those joists are at least 21" on a center. They've already started bellying down. I want to sister or even triple sister them, but I can't fully do it without gutting the adjacent room. I was thinking about resting the sister joists on the support on the end that is visible to me, and bolting them to the existing joist as far as I can as work. Picture below.

Any thoughts?

Ceilingjoists.jpg
 
I will start by saying I wouldn’t do that unless the floor above has some real need for improved strength, and if that’s the case I would get into gutting the next room and doing it all the way thru the house. That nonbearing wall will add little to the strength. Chance are it doesn’t as it’s been working ok all these years. The 21 on center could be a problem with drywall as will the unevenness. If the only problem is in making a nice flat finished ceiling I would fur the ceiling down running the furring strips on 16” centers going the other direction. Find the lowest point on the joists and use that as your reference point and shim all the furring down to that point. A water level works great for doing this.
 
Thanks bud, I need to evaluate whether the ceiling needs that.

The floor of this bedroom does need some additional strength. It already has bellyed down. The floor joists don't seem to be resting on anything other than the side walls, and we're talking about a span of ~20 feet.

What do you think about sistering the floor joists up as far as I can work with, without gutting the next room?
 
I don’t think it will add much strength and will add a lot of weight. It’s an old house that droop has happened over a long time span IMO
 

Latest posts

Back
Top