welcome to the doghouse

House Repair Talk

Help Support House Repair Talk:

This site may earn a commission from merchant affiliate links, including eBay, Amazon, and others.
I finally got around to painting the new hood. I painted it and got a lot of orange peel in it again, so I took it over to custom body and sound here in town that I have worked with a lot over the years and asked them to help me wet sand it out. they did and then clear coated it. it turned out pretty well. CW says I need to wait a bit and then color sand it, but the rest of the car has far from perfect paint so I think I will just leave it alone until I paint the whole thing. I also took a dent out of the drivers side door and repainted it. I messed it up at first but talking with CW I discovered the main thing I was doing wrong was not putting the first coat down heavy enough, so I was putting it on too dry I guess. anyway the second time I put it on heavier and it turned out pretty well. not perfect but again pretty adequate. I am pretty happy with the appearance overall. I am going to have a vinyl decal made to put on the fake opening to look like the mesh that goes in some scoops. I don't want to cut it out and make it functional for several reasons. the biggest is the dirt road I live on it will just make keeping the engine clean that much harder. so anyway this is how it looks currently.


I got the decal installed in the hood last night. also the drivers side taillight had a big crack in it so I bought some nice stock style replacement lights to go in it. I will take some pics this weekend. since I have done so much work to it I decided to show it off a bit. yes it is still a daily driver but we have a nice little car show here in town every year so I am going to put it in and see how it does. I will park it next to the 65 and my daughters 67.

I also bought a bunch of weatherstripping for the jeep hardtop and a new stereo for it. once all the parts get in I plan to restore that top. I am going to paint it black instead of tan for two reasons. first my daughter really wants it to be black, and second black is a lot easier to find to touch up spots as scratches happen or as it fades over time. so I will post some progress pics as we tear into it. I plan to start it after our barbeque this weekend.
 
We had a good time at Atlanticfest car show. it was a great show with the most cars we have ever had. I did not take too many pictures but here a couple.


and here is my Daughter with her first place trophy in the teen class.

 
I have been working pretty hard on the jeep top in my copious free time this weekend lol. anyway this is what I have accomplished.

first I spent a lot of time on the inside with a scotch brite and wax and grease remover. then I masked the whole thing off, and painted the inside bright white. then I set it down on some buckets to work on the outside.


then I read on jeep forum that many people had successfully used a roller to paint the top. I was unsure about that but I decided to give it a try. we decided to use semigloss black paint. first because that is what my daughter wanted and second because I thought it would be easier to touch up later. anyway...


then I lifted it up again and put the new window trim and seals in place, and spent several hours scraping 2 layers of window tint off the windows. I would like to re-tint it at some point but the old stuff had to go as it was peeling off and looked like crap.


I think it looks pretty good.

now I have to do something that I am of two minds about. I have decided that I am going to put carpet in there. flameon I like the fact that the jeep is bed lined, however last winter the floor was very cold and it has lots of drain holes in it. I decided the best way to "winterize" the inside a bit more, besides just fixing the weatherstripping, was to carpet it. I will have to keep a close eye on it to make sure the carpet is not getting and staying wet. I know it is not an ideal situation and will likely get me flamed, but as I said the main purpose in this jeep is be a cold weather rig. so I will have to make compromises on what I would like to do. anyway the carpet is bought and is in the process of being shipped. it should be here soon. I am going to wait to put the top on until after I get the carpet in to make it a bit easier to work on it.
 
yesterday I got quite a bit done. I took the bikini top off and pulled the seats and center console. I had to have my daughter help me with the center console. someone had to hold the wrench on the underside after all lol.


then I took the rear view mirror off and put one in from a 99 mustang convertible. it has the built in maplights and surprisingly it slipped right onto the original mounting bracket. then I ran the wires down behind the weatherstripping and plugged into an add a circuit in the fuse box.


yes the windshield is dirty but its a jeep for crying out loud lol.

then I started putting the carpet in. I want to be able to pull it out and replace it easily when it gets wet or stained so I did not use any adhesive. it is just held in by bolts and a few screws.

btw here is a little tip I like to use when I am installing auto carpet. should anyone decide they want to put carpet in some where.

I have an old electrical tester that I broke years ago but it works great for this. if you can find the hole from the top just poke it through the carpet. or you can poke it up through the carpet from the other side. either way once the probe is poked through the hole this is for one of the seatbelt mounting tabs.


then take your soldering gun and it will melt right down along the probe and into the hole. if you poked it through from the bottom it will fall out or just pull it out from the top. then the soldering gun will melt the carpet back to the edges of the hole, you can move the gun around a bit to make the hole bigger. once you are done you have a hole that is melted just like you would do with the cut end of a nylon rope. it won't fray or pull the strands of the carpet like using a drill or hole saw.


ok so as I was installing the carpet I found some little things that needed to be addressed. there were some small parts that had surface rust, or just looked bad. like the tailgate latch.


so a little time with a wire wheel and my little scotch brite pad on my air sander.


and a little time with my eastwood powder coater.


a little wire wheeling, sanding and some chassis black.


then my wife bought me these little LED lights for my birthday and I did not really know what to do with them but I decided to put them on my center console. they stick on and are out of the way. I decided to just wire them into my light circuit so they come on whenever I turn on the lights.
to Illuminate the Dew lol.

 
then I finished installing the carpet, fixed and reinstalled the seats and center console, as well as washing and reinstalling the seatbelts.


then I put new weatherstripping on the top and put it back on.


then I replaced the door weatherstripping. I should note I also put new weatherstripping under the shell. so hopefully we are all sealed up and ready for winter. where is that fingers crossed icon I need again lol.
 
Looks great! I need to give my jeep some love and prep it for winter.
 
since the conversion to fuel injection I have been driving the jeep a lot. it is running well It has a very slight stumble at 2500 rpm, but otherwise is very smooth. I am going to have the codes read tomorrow. I used the check engine blinking light thing and decided it was too annoying. I know someone who has a code reader that will work though. anyway, it is only a slight stumble and not really bothersome for driveability.

however while I have been driving it I fixed a few other little things.
first the turn signal would not cancel when you turn left.

so I pulled the steering wheel. frequently you will see people say you need special tools to fix this little annoyance but you really don't. when I take the steering wheel off I almost never use a steering wheel puller. I loosen the nut until it is even with the top of the threads of the shaft. then pull up on the steering wheel with one hand and whack the nut sharply with a ball peen hammer. it nearly always pops off with just a whack or two. then finish removing it.

next remove the little plastic cover under the wheel by prying gentle with a screw driver.

then you have to remove the locking ring. this usually requires a special tool. I do not have that tool, but it is a very simple thing to accomplish.
I used an old piece of angle iron and two bolts, and a washer. once it is adjusted you just tighten the bolt on the shaft and it compresses the ring very easily.


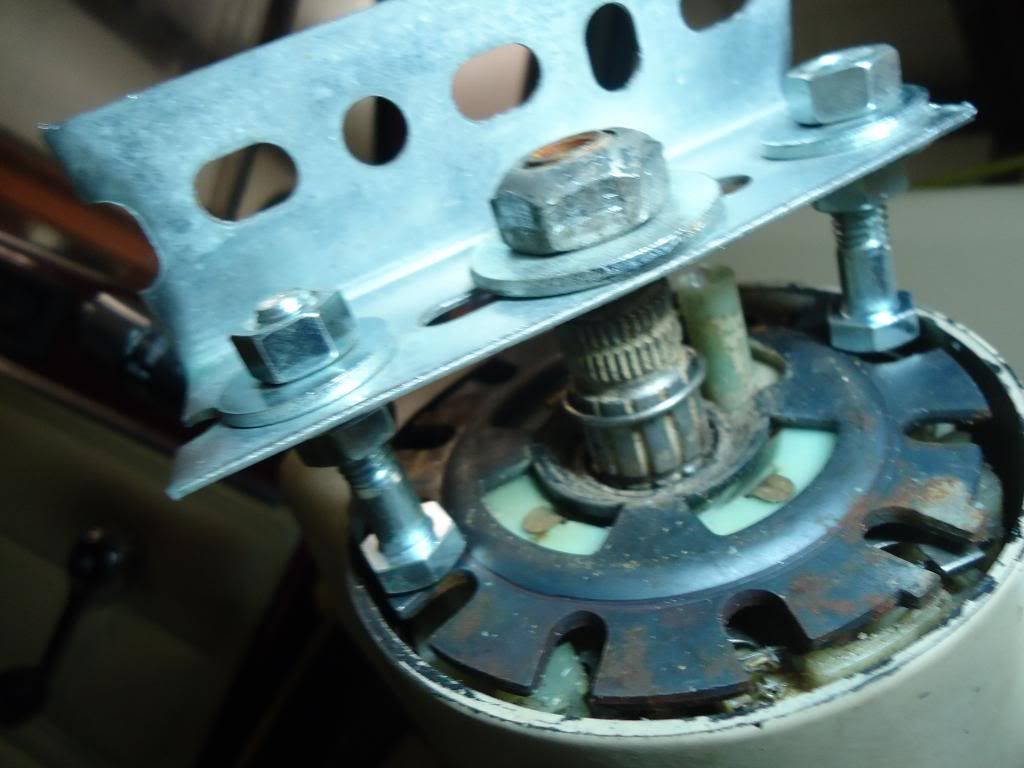
then using an o-ring pick and a small screwdriver carefully work the lock ring out of the groove. then remove the ring.

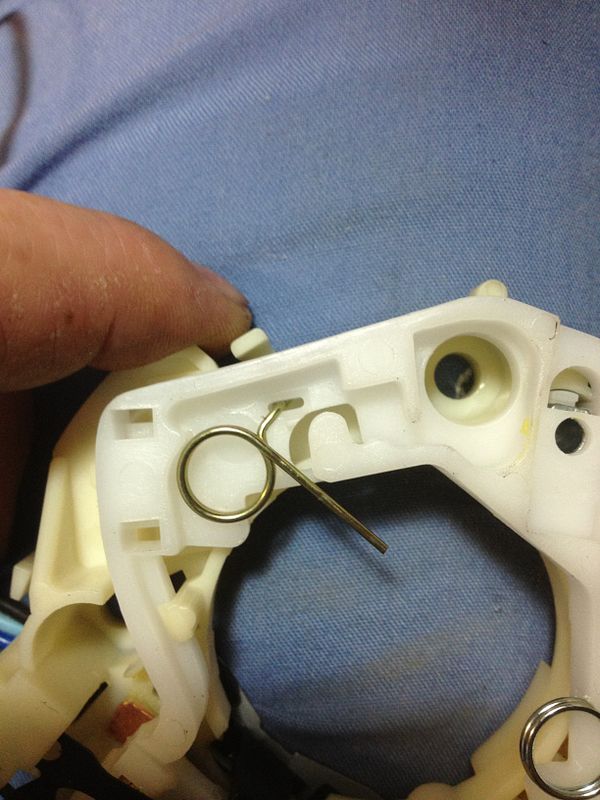
this is what you will see then.


as you can see there is a small spring in the right upper side. there is not one on the other side. this is how it should look.


I have been told you can buy the spring separately but since sometimes there is a broken arm or the cancelling cam can be broken so I just bought the whole switch. it cost 23.00 at o'reillys. the spring would be a lot cheaper. since all that was wrong with it is the spring I decided to save the switch for the next time it brakes and just swap in the spring. also since this was the first time I had done this repair I wanted the complete switch so I could compare to see what was broken. anyway once I discovered what was wrong I tried to swap the spring in, but it would not slide into the small hole. on the new switch you can see there is a slot to make replacing it easier. so I used a small drill bit to slightly enlarge the hole. then the spring slid in without difficulty. then reassemble in reverse. piece of cake.

seriously I have been annoyed by this for months. and it was a very easy repair, it took less than an hour.

tonight I had been bugged by the fact that the outside lock cylinder on the passenger side was hanging out of the hole. obviously the retaining spring was missing.

so I took the door apart. I had some left over from my mustang restoration that I hoped I could use but no such luck. I was getting ready to just put the door panel back on when I decided to check the bottom of the door to see if perhaps it had just fallen off. to my surprise I found it. it was not broken so I lubed everything up and reinstalled it. I did not take any pictures, but it wasn't bad. I was able to maneuver it in place behind the window regulator rail and lock it in place by driving it in place with a screwdriver.


I also installed an optima red top battery today.


I took the jeep through the automatic car wash the other day just to see where all the leaks could be found lol. anyway the top sealed really well actually but the drivers wing window leaked like a sieve. it also has a really ugly rusted latch. so I found a used one on ebay and it should be here soon so that will be my next task. I plan to gather up some parts. I think I will see about replacing the door panels and the outside door latches at the same time.
 
I am jealous of your work, you make me want to go out and finally do some much needed repairs to mine. I wheel the piss out of it then it sits halfway broken for a few months. I need to drive it more on the road I guess.
 
sadly I don't get to wheel mine much. with my job I have to be within 30 minutes of work pretty much all the time so I don't get much time to play with my stuff. I really like fixing things though. my dad and I were talking the other day and I told him I need to get the 65 out and drive it a bit one of these days. I always like to drive whatever I am working on at the time. I have a really nice mustang. I have 2 trucks one of them is a 2006 with leather seats and all the bells and whistles. and I usually drive either my convertible or the jeep. this winter I will drive my 99 truck mostly. but sadly most of my driving is just to and from work which is about 15 minutes from my house. so I spend a lot more time working on stuff than I do actually driving it.
 
I have three trucks and two jeeps and drive the 03 F250 with 370,000 miles on it. I drive several hours a day each way to work.
 
that would be a pain to have to spend that much time just getting to and from work. it would really cut into your tinkering time.

on another note. I did tackle a small but annoying problem today. the washer hose on my hardtop popped off again. I think that something is missing I tried to find out what it is supposed to look like but I was not successful. mine has a small button on the hardtop then a piece of washer fluid line that was just capped off when I got it. i tried to connect it to the little button there but it would not stay. so today I decided to fix it another way.

so first thing I drilled out the four rivets holding the plate in place and removed it and the connectors. this is what it looked like.


so I cleaned it up, sanded it smooth with my belt sander and powdercoated it white.


then I bought a small double ended plastic hose barb.


drilled a hole through the little button just large enough to barely fit the hose barb. then I ground the little wings on the hose barb down so they will fit into the button.


and re installed it. I zip tied the inside because I wanted to make sure it did not come off in there. I pulled on it pretty hard to be sure it would not come off by accident.


then pop riveted it back in place.


it fits good and tight now and I can always zip tie the outside if it ever does come off. then I found that the prior owner had wired the switch backward so that both the washer and wiper came on when you turned the switch on and only the washer when you hit the momentary switch. so I pulled the wires out of the connector carefully and rewired it correctly. I need to buy a new switch though because this one is not in very good condition.

anyway another installment of fixing niggling little details that probably would not bother real jeepers but bug the heck out of me lol.
 
right now I am trying to figure out what my next project is going to be. I am tapped out as far as funds are concerned. I need to save up some money for christmas. we decided this year since my kids are older now, 15,17,20 and they really don't need anything this year. and we tend to buy them a lot of stuff at christmas that they rarely ever use, we decided this year instead of buying a lot of stuff we would take a trip instead. just spend some time together as a family. we are going to sedona. I know it probably won't be much warmer there than it is here, but we will see.

anyway I don't really have a project right now, and I got an email from the mustang car club I belong to in omaha about a cruise that is being put on jointly between our club and the classic mopar club. it is going on tomorrow so I decided since I don't have to work this weekend it would be a great opportunity to get the stang out. I have not hardly driven it at all this year. so I took it for a nice long drive today to make sure there weren't any issues that needed sorting, tightened up the header bolts. (dang things are always trying to loosen up on me )

then I cleaned it up for tomorrow. this is another one of those I love my shop moments.

I like to pull my car into what I call the lift bay and park it behind the lift. I have enough space to work completely around it without the lift interfering. so I blew it off with compressed air. then used the california duster to get the rest of the dust off, then on the top of the car I used the mequires quick detailer and a clay bar, then machine polish and my electric polisher. I did the top, the hood and trunk lid. then push it forward, put it up on the lift, raise it up to a nice working height and do the sides. it is so much easier that way. I am getting really spoiled in my old age. then I used my drill and power metal polish with a powerball mini and polished up the wheels. greased the front end while I had it up there, checked out the front suspension and looked for any leaks. checked the exhaust collector bolts and everything is hunky dory for tomorrow.


all done and ready for tomorrow.


Damn, that Stang is beautiful.
 
yeah I like the old stang. it is a blast to drive. it is showing it's age nowadays though. it looks good from a short distance, and as a driver it is still pretty nice but when I show it, you start to notice all the little rock chips, and the imperfectly aligned panels and things. it is a fun car to drive and I like to show it off but some day I am going to tear it down again and re do it. I think the next thing I am going to do is re wire it. I have been plagued with minor electrical problems for years. I put in a new original style wiring harness 15 years ago, but it needs to be redone. I think I will go with the same style I used in the 67.
 

Latest posts

Back
Top