welcome to the doghouse

House Repair Talk

Help Support House Repair Talk:

This site may earn a commission from merchant affiliate links, including eBay, Amazon, and others.
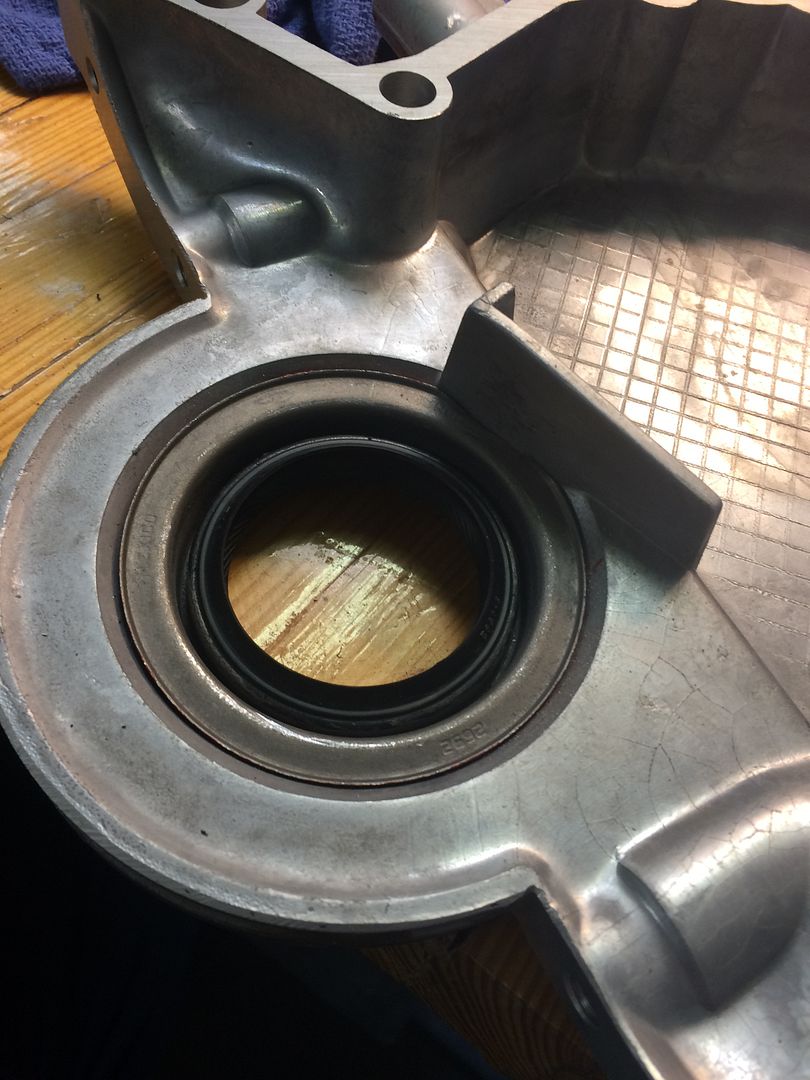
we finished up the short block today. I ran into a bit of a snag though. those used AFR heads I bought turned out to not be in nearly as good a shape as they were supposed to be. so I am going to buy some new ones. I used the old ones to check the piston to valve clearance and to measure the push rods. then we put the front cover on. dang chinese front cover the seal doesn't fit right. I had to grind it off a bit to get it in.


when I put the front cover on I like to put the harmonic balancer on to center the balancer in the front cover seal before I tighten the bolts on the front cover. then since most of the bolts holding the front cover on also go through the water pump I put it on as well. be sure to pull the backing plate off and add sealer on both sides of the gasket and reinstall the backing plate before putting it on the engine.


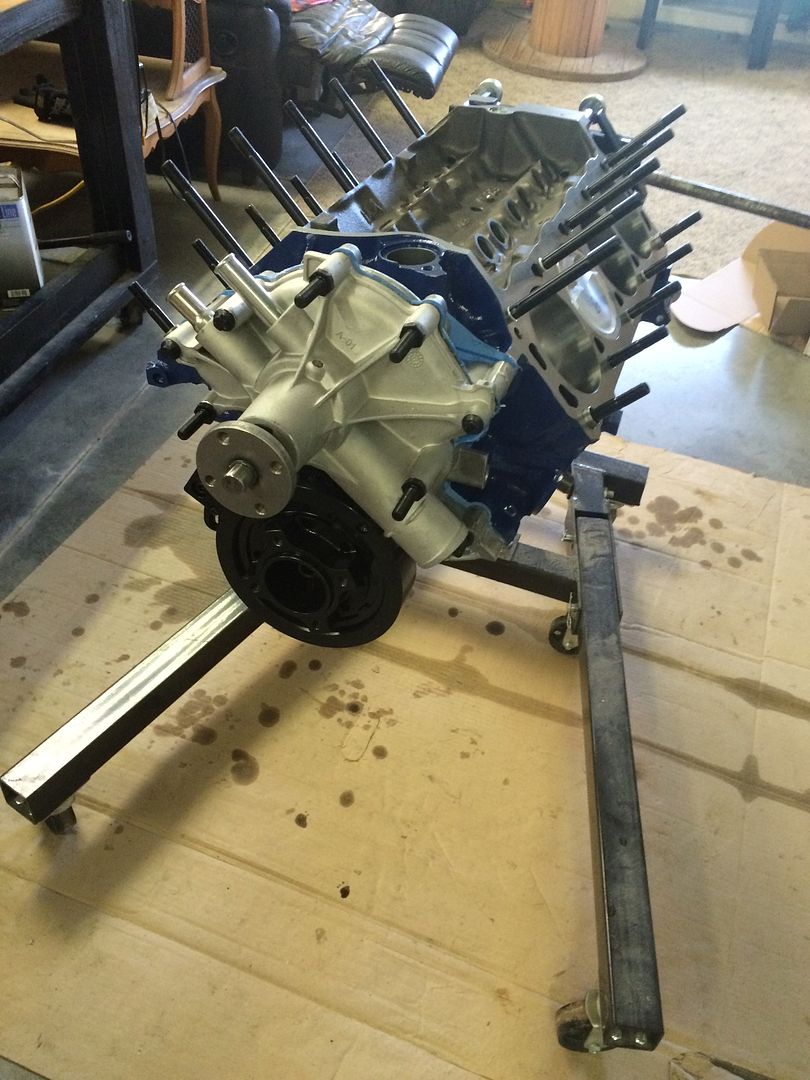
then we put the new oil pump and pickup on and checked the pickup to pan clearance with clay again before sealing up the one piece oilpan gasket on and buttoning up the bottom end.

I put a new oil filter on it and taped up the low oil sensor hole to reduce the dirt that can get in there. then I put the old heads and new intake on temporarily and wrapped it back up in plastic to await the new heads and pushrods. it will probably be 2-4 weeks before I get the new heads.
 
Nice blue paint on the block. Not only could you eat off it, I want to eat off it! :D
 
thanks. now I have to wait again for parts to arrive. I have pretty much everything else I need to finish the engine. but before I swap them I want to buy a new radiator and a new torque convertor. also I still need fuel injectors and the computer chip then dyno tuning. man this simple engine swap sure can get expensive.
 
I also found out that the reason the seal fit wrong was becaause we put the seal in backwards. it looks like that is the way it goes, and I have done it before so I don't know why I did it wrong this time, but whatever live and learn. now I get to do it again.
 
I also found out that the reason the seal fit wrong was becaause we put the seal in backwards. it looks like that is the way it goes, and I have done it before so I don't know why I did it wrong this time, but whatever live and learn. now I get to do it again.

Oh, if it can go in two different ways, I will always choose the way that is wrong...
 
Oh, if it can go in two different ways, I will always choose the way that is wrong...

I did some research and found out that they changed the seal in the early 70's so all the engines I have built before went in from the inside. but not so in the 5.0 oh well live and learn. that is why this is so much fun. (keep telling myself that anyway.)
 
Ok. the new heads came today Yeah.


first we put the guide plates and rocker studs on.

then we put the new ford racing roller rockers in followed by the dog bones and the spider.


then torqued the new heads in place. the ARP studs get torqued to 80 foot pounds.


then the push rods followed by the new comp cams roller rockers.


then we put the lower intake manifold on. the way we do it is we don't use the front and rear galley gasket pieces we just run a thick bead of RTV along the front and back. then I use two 5/16 bolts that are about 6 inches long and have the heads cut off with a cut off wheel. I thread those in finger tight one on each side of the engine and use that to guide the intake manifold down. then start bolts in the front and rear as I set it down. this keeps the gasket from slipping and makes sure it goes down straight every time.


then the BBK shorty headers. these are not the valve covers I plan to use. they were just some left over from another project and I put them on just to keep the dirt out of the engine. I plan to use the valve covers that are currently on the engine in the car now.


so now we are ready to pull the engine from the convertible and swap this one in. everything is ready to go. I probably won't do that until christmas though. that will be the next time I get enough time to do it.
 
Are you sure you want to put that in the Mustang? It makes a really nice piece of garage art sitting on the engine stand...:cool:
 
I'll give you $180 American for that motor. Just think it will save you the hassle of having to pull a motor.
 
well this is kind of funny in a "what an idiot I am kind of way". this stroker engine idea came about because I had a rear main seal leak. that would require pulling the engine or trans and it snowballed from that. so I put it up on the lift today to get ready for swapping engines and I found, guess what? I don't actually have a rear main seal leak, I have a leak from the low oil level sender. took my crescent wrench and snugged it up a bit, and no more leak. oh well lol I wanted to build a stroker for a while and that was just an excuse anyway, but it is funny. just can't let my wife know or I may end up brutally murdered or at least placed on a very strict allowance for a while. I guess I am going to have to take her on a really good vacation this winter lol.
 
just a little update here. I have been working on the car a bit when I have some time away from work and I can afford to get dirty. with my job those two things don't happen all that often. anyway since I have never done any work on 5.0 engine and neither has my Dad. so I had this old label machine that I bought for my office that i no longer used. I decided to use it to label my lines and connectors as I took them apart.


I also did a couple video's to show the engine I pulled was running great. no problems just had a few oil leaks that needed fixing lol.


then I bought a box of ziplock bags and a sharpy and put the bolts from each small section of work into an individual ziplock so I would not have trouble figuring out where the bolts go. each bag then went into a box set on my workbench. and pictures were taken as I took it apart.

first step drain the fluids. water and oil

then remove the battery and battery tray.

then the fan shroud was removed and slid onto the fan.
then pull the radiator.

then pull the belt.

then since the front accessory brackets are always a pain to figure out how they go back together I took pictures as they came apart.

alternator wiring.


powersteering and ac bracket


alternator bracket


outer powersteering bracket removed. powersteering pump and ac pump moved out of the way and wired up where they would not be in the way. this is the back bracket for the powersteering pump.


then pulled the intake manifold. this is how the vacuum etc goes on under the manifold.


I had already disconnected the throttle cables and the egr, tps, and iac connectors and carefully labeled them.

then I removed the fuel lines and rails. I had a heck of a time getting the fuel lines apart. I had the correct tool but I did not realize you had to twist them and pull pretty hard after releasing them with the tool. but I got them loose.

then pulled the starter, exhaust, bellhousing bolts, dust shield and torque converter bolts.

then made sure everything was loose and pulled the engine.

 
while I had it out I spent some time with a pressure washer and some engine degreaser although it did not really look like it after I got it back in the shop sadly. this thing looked good from the top but underneath it was a greasy mess. anyway. after I cleaned it up as good as I could, or rather until I got sick of working on it, we pushed the car back inside. then we replaced the front seal on the transmission and put a quart of atf in the new 2200 convertor and put it in to the transmission.
so we pulled off the stuff we needed from the old engine and cleaned it up a bit


in that picture you can also see the mechanical oilpressure gauge in place so we could make sure everything worked right when we spun up the oilpump and preoiled everything. I also had the valve covers off so we could see the oil coming up into the valvetrain.

then we put the new thermostat in place.

this rubberband trick makes that a lot easier.


then we dropped the new engine in place.

I do not know if this is typical for this car because I have mostly worked on classic mustangs, however for some reason the torque convertor would not slide back far enough into the bellhousing to allow it to spin freely when we pulled the old engine, and this turned out to be a major pain when we dropped the new engine. because of course the bolts on the convertor did not line up with the flex plate and we had to get the transmission jack out and lift the transmission and finagle the torque convertor into the proper alignment and of course the studs were wedged against the flexplate. anyway we finally got everything lined up and bolted up the bellhousing and motor mounts.


I powdercoated the powersteering bracket and painted the belt tensioner and alternator bracket assembly with alumablast paint.


then I hooked up all the wiring harness and put the battery in temporarily and cycled the fuel pump a couple of times to make sure I had no fuel leaks.


then the new intake manifold and the chrome powersteering cover. and the wiring harness.


I still have to put the alternator on, and i have a new fan I need to swap because the old one was broken in several places. I have to figure out what I am going to do with that shroud too. I think I will try to paint it, it is so faded it looks brown and it is terribly ugly. and I still need to put the h pipe back on and hook up the o2 sensors. but I am getting closer.

I forgot to mention that these valve covers had to be modified to fit with my roller rockers. the little splash baffle in there hit on 2 of the rocker studs. a little judicious use of the die grinder and some manual molding of the baffle and everything clears. there is still plenty of room for ventilation and the oil should still flow in with no problems.


and before anyone asks yes I am going to remove all the labels I just need to sneak a pair of sharp scissors out of the house without my wife catching me lol.
 
Wow! Great work! I remember back when I had that kind of time.
 
Wow! Great work! I remember back when I had that kind of time.

Yeah I don't really get a lot of time, but I spend a bit here and there. I had last weekend off so i spent one whole day swapping the engine. just getting the old one out and the new one in. but prior to that I started dissassembling things and powdercoating and cleaning parts. I usually have an hour or two a night to tinker after the kids go to bed. and an hour here and an hour there and I eventually get it done.

I did not do all this at one time I just finally got around to updating my progress. remember the engine was built in october so not so terribly fast lol.
 
got a bit more done the last couple days.

alternator is in, new fan, powdercoated the pulley, new shorter belt, cap, rotor plug wires and wire looms.
I also got the cold air intake back on.


then I tackled that old ugly radiator and fan shroud. the radiator had been leaking at the drain plug so I took a wire brush and some carb cleaner and compressed air and cleaned it real thoroughly then painted with eastwood radiator paint. (man I sound like an eastwood advertisement lol. but I do get a lot of stuff from them).

then I spent some time scrubbing the fan shroud and the overflow bottle. the overflow cleaned up surprisingly well with some soap and water and a bit of carb cleaner. then I painted the shroud with some crylon fusion paint, I chose a semi gloss black so it would look more like stock, and I carefully masked off the sticker for the ten pin plug retrofit. I do not know how well it will hold up but it looks a lot better to my eye.


Latest posts

Back
Top