
You are using an out of date browser. It may not display this or other websites correctly.
You should upgrade or use an alternative browser.
You should upgrade or use an alternative browser.
Humble 3 Car
- Thread starter ME87
- Start date


Help Support House Repair Talk:
This site may earn a commission from merchant affiliate
links, including eBay, Amazon, and others.
")
- Joined
- May 20, 2010
- Messages
- 5,326
- Reaction score
- 1,375
and had to tear into the motor on the CJ
Wait just a minute....That is a V-8....!
ME87
Active Member
- Joined
- Nov 2, 2011
- Messages
- 31
- Reaction score
- 0
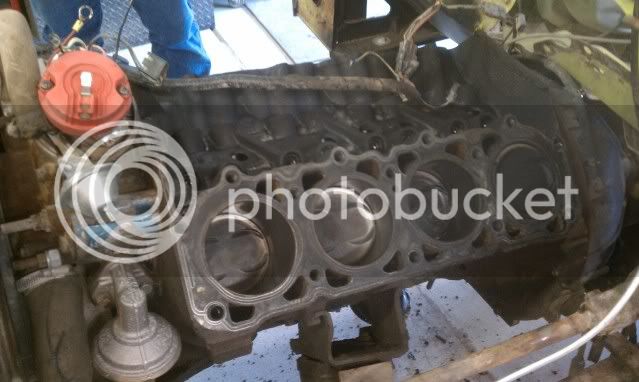
Yeah this is the CJ my dad currently has and is doing the body restore on. When the body was pulled we power washed the chassis pretty good and then let it sit against our better judgement. Put the body back on a few weeks ago with the major integrity issues repaired and tried to turn the motor over. It was locked up tight. We pulled all the plugs and filled the cylinders with ATF and let it sit to no avail. Pulled the heads and the pan on Thanksgiving to find one cylinder that had gotten water in it. Figured the exhaust valves were open on that cylinder and with a leaky exhaust gasket on that side it allowed water in the cylinder. We were able to free it up with the heads off yesterday afternoon. Put it all back together last night and it runs as good as a 304 with 230,000 miles on it should. Take note, as fire them up after a good wash to burn off any water.
On a side note, when I pulled the pan this is part of what I found in there, along with a lot of bearing material. So at some point in this motors past it lost a bearing and a pushrod somewhere, how or why they didn't clean the pan or even pull the pan to do the repair is still a riddle to me.

On a side note, when I pulled the pan this is part of what I found in there, along with a lot of bearing material. So at some point in this motors past it lost a bearing and a pushrod somewhere, how or why they didn't clean the pan or even pull the pan to do the repair is still a riddle to me.


- Joined
- May 20, 2010
- Messages
- 5,326
- Reaction score
- 1,375
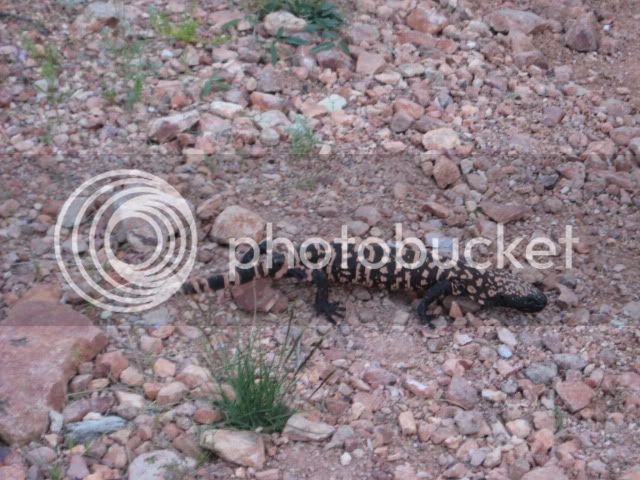
Good choice. To fill those expansion joints would not be a good thing and if you ever did get a stress fracture within the crack, as you should, filling it would just look ugly and hard to patch. BTW, is that little lizard safe now?
ME87
Active Member
- Joined
- Nov 2, 2011
- Messages
- 31
- Reaction score
- 0
My wife would kill me if something happened to the lizard, so he is indeed safe. We often look for snakes, spiders, lizards, bugs, animals, and other things that most women don't care for, on our offroad expeditions.
These guys are still the coolest

These guys are still the coolest
ME87
Active Member
- Joined
- Nov 2, 2011
- Messages
- 31
- Reaction score
- 0
From my understanding they are only 1 of 2 venomous lizards and they also provide a very nasty bit because they tend to hang on and grind the relatively small amount of venom into the blood stream.
Bay 1 Complete
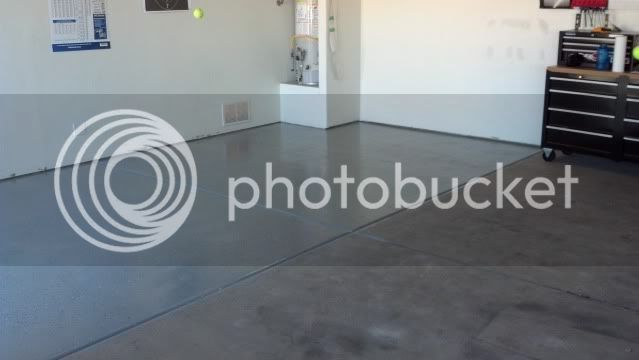
The walls are getting painted anyways so I wasn't very careful about avoiding them and I plan on installing a plastic strip to seal bottom anyways. One thing to note is that although I felt I applied a pretty generous amount to all areas, I did have enough left over to be even more generous, so apply it heavy. I also did buy 1 extra can of chips, but I think the supplied amount is good for a 1 car as I have quite a bit left over and the floor still has a nice coating of them.
-Also I'm glad I chose to paint the walls after the floor because even though I have to deal with keeping paint off my newly epoxied floor, that will be much easier than keeping the acid etcher off the walls and as I learned that stuff is deadly to latex paint.
Bay 1 Complete
The walls are getting painted anyways so I wasn't very careful about avoiding them and I plan on installing a plastic strip to seal bottom anyways. One thing to note is that although I felt I applied a pretty generous amount to all areas, I did have enough left over to be even more generous, so apply it heavy. I also did buy 1 extra can of chips, but I think the supplied amount is good for a 1 car as I have quite a bit left over and the floor still has a nice coating of them.
-Also I'm glad I chose to paint the walls after the floor because even though I have to deal with keeping paint off my newly epoxied floor, that will be much easier than keeping the acid etcher off the walls and as I learned that stuff is deadly to latex paint.
- Joined
- May 20, 2010
- Messages
- 5,326
- Reaction score
- 1,375
That really looks slick. I can't wait to see the other side done now!
When I did mine, I believe I waited too long to apply the "sprinkles" because the first time I swept it out, at least 1/2 of the "sprinkles" blew away. I now wish I would have just purchased more of the sand traction stuff instead of the sprinkles, because it really makes it non-slip and more uniform in color. The downfall to that is that every speck of dirt will show up, unlike the "sprinkles" which camouflages the dirt.
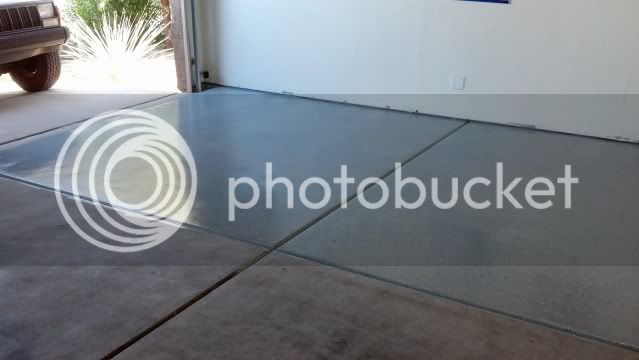
Also, where did decide to stop the paint at the roll down door? I'd like to see a picture of it if possible so others will understand the different options available.
When I did mine, I believe I waited too long to apply the "sprinkles" because the first time I swept it out, at least 1/2 of the "sprinkles" blew away. I now wish I would have just purchased more of the sand traction stuff instead of the sprinkles, because it really makes it non-slip and more uniform in color. The downfall to that is that every speck of dirt will show up, unlike the "sprinkles" which camouflages the dirt.
Also, where did decide to stop the paint at the roll down door? I'd like to see a picture of it if possible so others will understand the different options available.
ME87
Active Member
- Joined
- Nov 2, 2011
- Messages
- 31
- Reaction score
- 0
The question you pose is a good one. I'll post some pictures of what I did and how I plan to fix it. What I will do in the next 2 is tape a line where I want to stop, but on this one I just over painted where I wanted to and I'll have to take a wire brush on my grinder to get the edge I'm looking for, but the way my concrete is poured it shouldn't take longer than about 30 min to do what I have in mind and should work fine.
Also I applied the sprinkles as I went using my homemade "salt" shaker. From what I've seen in the past I should have about 10% come loose. My dad has one of his big bays with the traction stuff and it's just too hard move around on when under a car and not on a creeper so I opted not to use it.
Also I applied the sprinkles as I went using my homemade "salt" shaker. From what I've seen in the past I should have about 10% come loose. My dad has one of his big bays with the traction stuff and it's just too hard move around on when under a car and not on a creeper so I opted not to use it.
ME87
Active Member
- Joined
- Nov 2, 2011
- Messages
- 31
- Reaction score
- 0
Here is how it looks right now

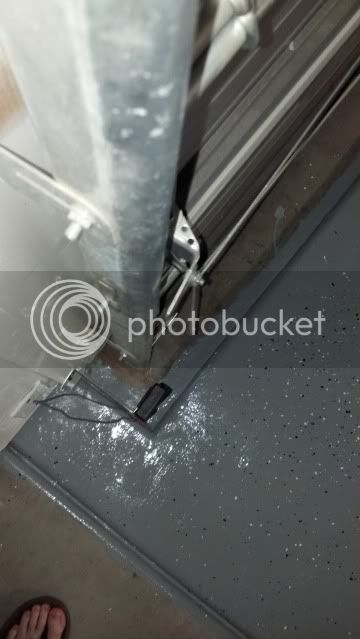

I plan on making a piece of metal like shown in the diagram below that will allow me 1/2" of overlap off the edge of the slab as shown. Since I have over epoxied by about 1.5" I think a wire brush on my grinder will work well as I have done this on accident before and it removed epoxy quite effectively. This should give me a nice sharp edge where I want it.

Flake shaker
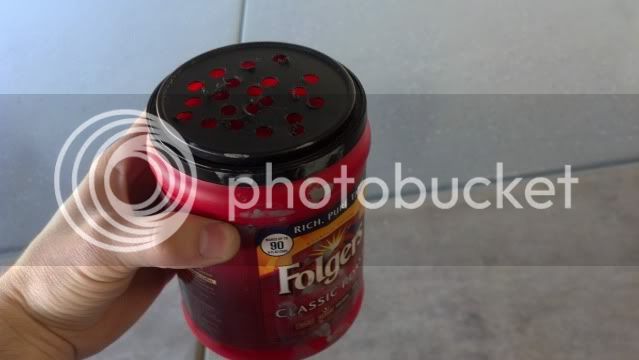
I plan on making a piece of metal like shown in the diagram below that will allow me 1/2" of overlap off the edge of the slab as shown. Since I have over epoxied by about 1.5" I think a wire brush on my grinder will work well as I have done this on accident before and it removed epoxy quite effectively. This should give me a nice sharp edge where I want it.
Flake shaker